COBOX-FL-11 Lantronix, COBOX-FL-11 Datasheet - Page 33
COBOX-FL-11
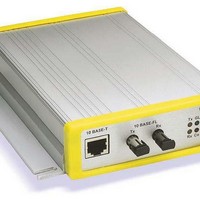
Manufacturer Part Number
COBOX-FL-11
Description
Ethernet Modules & Development Tools EXTERNAL DUAL PORT
Manufacturer
Lantronix
Type
Device Serversr
Datasheet
1.COBOX-FL-11.pdf
(135 pages)
Specifications of COBOX-FL-11
Product
Modules
Lead Free Status / RoHS Status
Lead free / RoHS Compliant


3. In the Enter IP Address to assign field, enter the unit’s IP address in
4. In the PC Network Class section, select the class (subnet mask). (Most users select Clas
5. Click the Set IP Address button. (IP is assigned, pinged, and tested)
6.
7. Click the Back button to return to the DeviceInstaller window.
2.4.3 Test the IP Address
1. Click the Ping icon
Figure 7 - Ping Device Window
2. Confirm that “Reply received” messages displa
Note: If you do not receive “Reply received” messages
attached to the network and that the IP address
segment you are working with. If you are not sure, check with your systems administrator.
3. Click the Back button to retu
CoBox-FL User Guide
XXX.XXX.XXX.XXX format.
C).
Confirm th
address has been entered successfully.
at the “Assign IP successful” message displays and click OK.
. The Ping Device window displays.
rn to the Device Installer window.
assigned is valid for the particular network
y in the window, indicating that the IP
, make sure the unit is properly
Getting Started
2-7
s
Related parts for COBOX-FL-11
Image
Part Number
Description
Manufacturer
Datasheet
Request
R

Part Number:
Description:
Ethernet Modules & Development Tools COBOX FL IAP-11 Industrial
Manufacturer:
Lantronix
Datasheet:
Part Number:
Description:
Ethernet Modules & Development Tools 2-Port
Manufacturer:
Lantronix
Datasheet:


Part Number:
Description:
Ethernet Modules & Development Tools XPort Pro Sample Ext Temp Encryp&Evol OS
Manufacturer:
Lantronix
Datasheet:
Part Number:
Description:
Ethernet Modules & Development Tools XPort Pro Sample Ext Temp Encryp&Linux OS
Manufacturer:
Lantronix
Datasheet:

Part Number:
Description:
WiFi / 802.11 Modules & Development Tools MatchPort Demo Kit Module not included
Manufacturer:
Lantronix
Datasheet:

Part Number:
Description:
Development Software MatchPort Developer Kit
Manufacturer:
Lantronix

Part Number:
Description:
Ethernet & Other Communication Accessories XPress-Pro SW 92000 8-Port 10/100TX
Manufacturer:
Lantronix
Datasheet:

Part Number:
Description:
Ethernet & Other Communication Accessories XPress-Pro SW 52000 Ind 5-Port 10/100TX
Manufacturer:
Lantronix
Datasheet:
Part Number:
Description:
Ethernet Modules & Development Tools XPort Pro Ext. Temp w/ Encryp & Evol OS
Manufacturer:
Lantronix
Datasheet:

Part Number:
Description:
Sun Microsystems, TTL, 8 pin mini-din and DB9 serial port
Manufacturer:
Lantronix
Datasheet:
Part Number:
Description:
Transceiver, DVI-Fiberlynx, PS/2KB/Mouse, Transmitter
Manufacturer:
Lantronix
Part Number:
Description:
Ethernet, SecureBox SDS1100 Single-Port Secure Device Server
Manufacturer:
Lantronix
Part Number:
Description:
Communications, The MPS/LPS Micro Print Servers
Manufacturer:
Lantronix
Datasheet:
Part Number:
Description:
WiFi / 802.11 Modules PremierWaveXN 802.11 Device Server US
Manufacturer:
Lantronix
Datasheet: