ETRX3DVKA357 Telegesis Ltd, ETRX3DVKA357 Datasheet
ETRX3DVKA357
Manufacturer Part Number
ETRX3DVKA357
Description
KIT DEVELOPMENT FOR ETRX357
Manufacturer
Telegesis Ltd
Type
ZigBit™r
Specifications of ETRX3DVKA357
Frequency
2.4GHz
Kit Contents
3x ETRX35xDV Development Boards, 3x USB Cables, 2x ETRX35x On Carrier Boards, 2x ETRX35xHR Boards
Mcu Supported Families
ETRX3
Silicon Manufacturer
Telegesis
Rohs Compliant
Yes
Lead Free Status / RoHS Status
Lead free / RoHS Compliant
For Use With/related Products
ETRX357
Lead Free Status / RoHS Status
Lead free / RoHS Compliant, Lead free / RoHS Compliant
Other names
920-1009
ETRX2DVK357
ETRX2DVK357


By default all nodes (except coordinators) are set up to check once every
minute whether any neighbours on the same PAN are present, or whether they
are orphaned. If no neighbours have been found after a couple of minutes, the
unit will leave the (deserted) PAN and try to join into a new one once every
minute.
This initial network setup can take a few minutes, especially with no serial
access to remote nodes, but once the network is set up it will remain set even
after power cycles.
New nodes joining will cause a prompt ‘NEWNODE: <EUI64>’
side, where <EUI64> is the unique 64-bit identifier of the device joining in, and
display the JPAN message locally as described above.
To learn more about setting up and maintaining a PAN please refer to the AT
Command Dictionary.
4 Configuring Buttons for your set-up
After setting up the network, press the button labelled ‘Configure’ which will
issue a command to scan the network causing all the nodes in the network to
report in. You will see that on discovery of a remote device its serial number is
added to the device list window. In addition to this, the configure functionality
will build additional buttons to play a tune on a remote board (‘Ident Node x’).
By looking at the actual commands behind these new buttons it is quite easy to
understand how the AT-Command interface operates. Also you can easily
discover the principle of mesh networking: simply move a Development Board
out of range and then add a Development Board between the local node and
the one which is out of range and you will find that the network has healed the
broken link and all three nodes are accessible again.
With a Development Board and a USB stick you can send messages between
two PCs using the Broadcast or Unicast buttons and by experimenting with
those buttons you will quickly get an understanding on how to integrate the
ETRX357 into your application.
The Telegesis Terminal Application also allows you to create custom command
buttons for your individual application, just click on Commands / Add
command button…
1
R3xx firmware will also report Extended Pan ID and module’s short address
1
on the remote
ETRX3DVK Development Kit
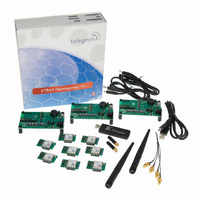
Your ETRX3DVK contains:
The ETRX3DVK Development Kit has been designed to allow quick evaluation
and prototyping using the ETRX3 wireless mesh networking modules. The
Long Range modules will allow you to test their greater outdoor range and
within-building penetration.
•
•
•
•
•
•
•
•
•
3 x ETRX35xDV Development Boards
3 x USB cables
2 x ETRX35x on carrier boards
2 x ETRX35xHR on carrier boards
2 x ETRX35x-LR on carrier boards
2 x ETRX35xHR-LR on carrier boards
1 x ETRX2USB USB stick
2 x ½-wave antennae
2 x ¼-wave antennae
ETRX3DVK Development Kit
Quick Start Guide
TG-ETRX3DVK-QS-013-100
Quick Start Guide
1.00
Related parts for ETRX3DVKA357
Image
Part Number
Description
Manufacturer
Datasheet
Request
R

Part Number:
Description:
MODULE ZIGBEE USB STICK
Manufacturer:
Telegesis Ltd
Datasheet:

Part Number:
Description:
MODULE ZIGBEE PWR AMP USB STICK
Manufacturer:
Telegesis Ltd
Datasheet:

Part Number:
Description:
ZIGBEE ETHERNET ACCESS POINT
Manufacturer:
Telegesis Ltd
Datasheet:

Part Number:
Description:
ZIGBEE ETHERNET ACCESS POINT
Manufacturer:
Telegesis Ltd
Datasheet:

Part Number:
Description:
MODULE ZIGBEE EM357 W/CHIP ANT
Manufacturer:
Telegesis Ltd
Datasheet:

Part Number:
Description:
MODULE ZIGBEE EM250 CHIP ANT
Manufacturer:
Telegesis Ltd
Datasheet:

Part Number:
Description:
MODULE ZIGBEE W/PWR AMP
Manufacturer:
Telegesis Ltd
Datasheet:
Part Number:
Description:
MODULE ZIGBEE W/PA LNA CHIP ANT
Manufacturer:
Telegesis Ltd
Datasheet:
Part Number:
Description:
MODULE ZIGBEE W/PA LNA U.FL
Manufacturer:
Telegesis Ltd
Datasheet:
Part Number:
Description:
MODULE, ZIGBEE, ETRX351, CHIP ANT
Manufacturer:
Telegesis Ltd
Datasheet:
Part Number:
Description:
MODULE, ZIGBEE, ETRX3, HIROSE
Manufacturer:
Telegesis Ltd
Datasheet:
Part Number:
Description:
MODULE, ZIGBEE, ETRX3, PA+LNA, CHIP
Manufacturer:
Telegesis Ltd
Datasheet:
Part Number:
Description:
MODULE, ZIGBEE, ETRX3, PA+LNA, HIROS
Manufacturer:
Telegesis Ltd
Datasheet:
Part Number:
Description:
MODULE, ZIGBEE, ETRX351, HIROSE
Manufacturer:
Telegesis Ltd
Datasheet:
Part Number:
Description:
MODULE
Manufacturer:
Telegesis Ltd
Datasheet:
ETRX3DVKA357 Summary of contents
Page 1
By default all nodes (except coordinators) are set up to check once every minute whether any neighbours on the same PAN are present, or whether they are orphaned neighbours have been found after a couple of minutes, the ...
Page 2
Before you start our Support www.telegesis.com and download the ETRX2USB drivers and the Telegesis Terminal software (the ETRX357 Development Board uses the ETRX2USB drivers). Install them on your computer. Also, we recommend you the Support ...