142-0694-061 Emerson Network Power, 142-0694-061 Datasheet - Page 7
142-0694-061
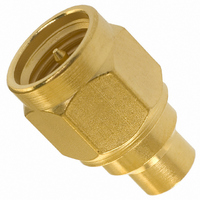
Manufacturer Part Number
142-0694-061
Description
CONN SMA PLUG SLIDE-ON .141
Manufacturer
Emerson Network Power
Series
SMAr
Datasheet
1.142-0694-061.pdf
(8 pages)
Specifications of 142-0694-061
Connector Style
SMA
Connector Type
Plug, Male Pins
Contact Termination
Solder
Impedance
50 Ohm
Mounting Type
Free Hanging (In-Line)
Fastening Type
Threaded
Cable Group
RG-402 (.141" Semi Rigid)
Frequency - Max
26.5GHz
Frequency-max
26.5GHz
Body Style
Straight
Cable Type
0.141 Semi Rigid
Features
Flexible Cable Types
Frequency Range
18 GHz to 28 GHz
Operating Temperature Range
- 65 C to + 165 C
Rf Series
SMA
Product
Various Connectors
Gender
Male
Contact Plating
Gold
Shell Plating
Gold
Termination Style
Solder Lug
Maximum Frequency
28 GHz
Lead Free Status / RoHS Status
Lead free / RoHS Compliant
Color
-
Lead Free Status / Rohs Status
Lead free / RoHS Compliant
Other names
J712


Emerson Network Power • Tel: 800.247.8256 • Fax 507.833.6287 • www.EmersonNetworkPower.com/connectivity
ASSEMBLY INSTRUCTIONS
STOP SCREW
30°
BULKHEAD JACK
CONNECTOR
STOP SCREW
POINTING TOOL
JACKET
CABLE
.141 (3.58) OD
SEMI-RIGID CABLE
SEMI-RIGID
.086 (2.18) OD
.141 (3.58) OD
BUSHING
140-0000-973
.022 (0.56)
CLAMP
SEMI-RIGID CABLE VISE
PLUG CONNECTOR
SOLDER
.129 (3.28) TO SHOULDER
BULKHEAD JACK CONNECTORS
.081 (2.06) TO SHOULDER
PLUG CONNECTORS
MATING
FIXTURES
30°
CENTER
CONDUCTOR
.085 (2.16)
140-0000-982
.086 (2.18) OD
BLADE
SEMI-RIGID
CLAMP
CLAMP
INSERTS
.014 (0.36)
Identify the connector (plug or jack) and tools
Strip the cable jacket and dielectric to dimension shown. Do not nick the center con-
ductor.
Bevel the entire diameter on the end of the cable center conductor until the point
resembles the appropriate dimensional profile. This operation can be accomplished
effectively by using the recommended center conductor pointing tool as described
in step 4.
Insert the stripped cable into the bushing of the appropriate pointing tool until the
center conductor just touches the blade. While maintaining light pressure on the
center conductor against the blade, turn the tool in a counter-clockwise fashion as
viewed from the bushing end of the tool. Continue cutting the center conductor
point until the cable jacket bottoms out inside the bushing.
Attach the appropriate soldering mating fixture to the connector and tighten to a
maximum of 8 inch pounds of torque.
Clean all debris from the prepared cable and insert the cable into the connector,
making sure that the cable jacket bottoms out against the internal shoulder of the
connector body.
Insert the stop screw into the mating fixture. Clamp the cable and fixtured connector
assembly securely in the soldering vise. Solder the connector body to the cable as
shown, while insuring the cable dielectric expansion does not move the assembly.
Allow the assembly to cool before removing the connector from the fixture
SMA - 50 Ohm Connectors
For Semi-Rigid Cable
7
Related parts for 142-0694-061
Image
Part Number
Description
Manufacturer
Datasheet
Request
R

Part Number:
Description:
CONN PLUG STRAIGHT SOLDER RG402
Manufacturer:
Emerson Network Power
Datasheet:

Part Number:
Description:
CONN PLUG STRAIGHT SOLDER RG402
Manufacturer:
Emerson Network Power
Datasheet:

Part Number:
Description:
CONN PLUG SMA .141S-RIG SLD NCKL
Manufacturer:
Emerson Network Power

Part Number:
Description:
CONN PLUG RA SOLDER GOLD SMA
Manufacturer:
Emerson Network Power
Datasheet:

Part Number:
Description:
CONN SMA PLUG STRGHT 50 OHM GOLD
Manufacturer:
Emerson Network Power
Datasheet:

Part Number:
Description:
RF Connectors PC END BLKHD JCK GLD .074" BOARDS
Manufacturer:
Emerson Network Power

Part Number:
Description:
AC/DC Front end 12Vo 36A 12Vsb Standard Airflow
Manufacturer:
Emerson Network Power

Part Number:
Description:
POWER SUPPLY DIN 24VDC 10A
Manufacturer:
Emerson Network Power
Datasheet:

Part Number:
Description:
POWER SUPPLY SGL 48VOUT 40W 3X5"
Manufacturer:
Emerson Network Power
Datasheet:

Part Number:
Description:
POWER SUP MED&ITE 48V 45W 2"X4"
Manufacturer:
Emerson Network Power
Datasheet:

Part Number:
Description:
POWER SUPPLY 60W 12V OUT
Manufacturer:
Emerson Network Power
Datasheet:

Part Number:
Description:
POWER SUPPLY 60W 48V OUT
Manufacturer:
Emerson Network Power
Datasheet:

Part Number:
Description:
POWER SUPPLY 60W 15V OUT
Manufacturer:
Emerson Network Power
Datasheet:

Part Number:
Description:
POWER SUPPLY TRPL 3.3/5/12V 40W
Manufacturer:
Emerson Network Power
Datasheet:

Part Number:
Description:
POWER SUPPLY SWITCHER 24V 40W
Manufacturer:
Emerson Network Power
Datasheet: