FLUKE-566 Fluke Electronics, FLUKE-566 Datasheet - Page 16
FLUKE-566
Manufacturer Part Number
FLUKE-566
Description
THERMOMETER IR W/PROBE MENU& MEM
Manufacturer
Fluke Electronics
Series
566r
Type
Handheld, Gunr
Specifications of FLUKE-566
Temperature Range
-40 ~ 1202°F (-40 ~ 650°C)
Temperature Display
C°/F°
Display Type
Dot Matrix
Input Type
Infrared; Thermocouple
Features
Alarm, Backlight, Laser Sight, Memory, MIN/MAX/Dif/Avg
Probe Type
K
Battery Type
AA (2)
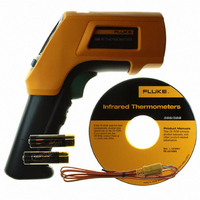
Includes
Case, Software, Thermocouple - K-Type Bead Probe
Lead Free Status / RoHS Status
Not applicable / Not applicable
Other names
2837799
614-1072
614-1072


566/568
Users Manual
8
Alarm
Trigger Lock
Laser
2. Press the Avg softkey.
The display shows the present reading, average reading, the differential reading between
max and min (designated by ), and the emissivity setting.
The thermometers have a programmable high and low alarm to designate high or low
readings depending on the thresholds entered. When the alarm level is reached, an alarm
will sound and the display will flash orange and white. To set either the high or low
alarm:
1. Press the Menu softkey until Alarm appears as the right softkey function.
2. Press the Alarm softkey to access the Alarm menu.
3. Press either the Hi or Lo softkey, depending on which alarm will be set.
4. Press the ON softkey to turn the alarm on.
5. Press the OFF softkey to turn the alarm off.
6. Use the Set softkey to access the Hi or Lo Alarm Set menu.
7. Use the down or up softkeys to change the alarm setting.
8. Once the desired settings have been entered, press the Done softkey.
The thermometer trigger can be locked on for continuous measurement. To lock the
trigger:
1. Press the Menu softkey until the lock symbol (G) appears as the left softkey
2. Press the G softkey to lock the trigger. The lock symbol appears on the display to
The thermometer is equipped with a laser used for aiming purposes only. The laser turns
off when the trigger is released.
To enable or disable the laser:
1. Press the Menu softkey until Laser appears as the right softkey function.
2. Press the Laser softkey to enable or disable the laser. * appears on the display
Min, Max, Avg, and Differential readings are saved as part of the saved
data when either Min/Max or Avg/Dif mode is enabled.
To avoid injury, do not point the laser directly at eye or
indirectly off reflective surfaces.
function.
designate a locked trigger. When the trigger is locked, the G softkey changes to H.
Press this softkey to unlock the trigger.
when the laser is enabled.
*W Warning
Note