A16-CTM Omron, A16-CTM Datasheet - Page 24
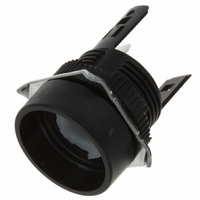
A16-CTM
Manufacturer Part Number
A16-CTM
Description
CASE ROUND 16 SERIES MOMENTARY
Manufacturer
Omron
Type
Round Caser
Series
A16r
Specifications of A16-CTM
Switch Type
Push Button Switch
Operating Temp Range
-10C to 55C
Illumination
Not Illuminated
Mounting Style
Snap On
Lead Free Status / RoHS Status
Lead free / RoHS Compliant
For Use With
A16 Series
Lead Free Status / RoHS Status
Lead free / RoHS Compliant, Lead free / RoHS Compliant
Other names
A16CTM


A16
Installation
After mounting the Pushbutton Unit (i.e., the Pushbutton and the
Case) to the panel, snap in the Switch Unit (i.e., the Switch and the
Lamp) from the back of the panel.
Mounting to the Panel
Insert the Pushbutton Unit into the front of the panel, and fix the lock
ring and mounting nut from the terminal side.
Make sure that the lock ring is aligned with the thread of the Case
and the edge of the lock ring is touching the panel.
Tighten the mounting nuts to a torque of 0.29 to 0.49 N m.
The maximum tightening torque is 0.49 N m.
Mounting the Switch Unit
Snap on the Switch Unit to the Pushbutton Unit.
Make sure that the Switch Unit has the correct orientation when
snapping it onto the Case. Align the S mark on the Case with the
groove between the case guards on the NC terminal side of the
Switch Unit in the way shown below, and push the Switch Unit into
the Case until it clicks into place. Confirm that the Switch Unit is
securely in place before using.
Panel Mounting
Case
Edge
Thread
Panel
Lock ring
Groove between
case guards
mark
Mounting nut
NC terminal
Removing the Switch Unit
Grip the part between the Switch holder of the Case and the Switch
Unit using the A16Z-5080 Extractor, and pull to remove the Switch
Unit.
The Switch Unit can be mounted or dismounted by simply opening
or closing the lever.
16-mm Models
A16-P Models (with PCB Terminals)
A16Z-5080 Extractor
A16
75
Related parts for A16-CTM
Image
Part Number
Description
Manufacturer
Datasheet
Request
R

Part Number:
Description:
LAMP LED 12VDC 16 SERIES RED
Manufacturer:
Omron
Datasheet:

Part Number:
Description:
LAMP LED 6VAC/DC 16 SERIES GREEN
Manufacturer:
Omron
Datasheet:
Part Number:
Description:
LAMP LED 6VAC/DC 16 SERIES RED
Manufacturer:
Omron
Datasheet:

Part Number:
Description:
LAMP LED 6VAC/DC 16 SERIES YEL
Manufacturer:
Omron
Datasheet:

Part Number:
Description:
SWITCH PB SQUARE MOM SPDT GREEN
Manufacturer:
Omron
Datasheet:

Part Number:
Description:
SWITCH PB SQUARE MOM SPDT WHITE
Manufacturer:
Omron
Datasheet:
Part Number:
Description:
SWITCH PB SQUARE MOM SPDT YELLOW
Manufacturer:
Omron
Datasheet:
Part Number:
Description:
SWITCH PB RECTANG MOM SPDT BLUE
Manufacturer:
Omron
Datasheet:
Part Number:
Description:
SWITCH PB RECTANG MOM SPDT YEL
Manufacturer:
Omron
Datasheet:
Part Number:
Description:
SWITCH PB SQUARE MOM SPDT BLUE
Manufacturer:
Omron
Datasheet:
Part Number:
Description:
SWITCH PB SQUARE MOM SPDT RED
Manufacturer:
Omron
Datasheet:
Part Number:
Description:
SWITCH PB RECTANG MOM SPDT GREEN
Manufacturer:
Omron
Datasheet:
Part Number:
Description:
SWITCH PB RECTANG MOM SPDT RED
Manufacturer:
Omron
Datasheet:

Part Number:
Description:
SWITCH PB RECTANG MOM SPDT WHITE
Manufacturer:
Omron
Datasheet:
Part Number:
Description:
SWITCH PB ROUND MOM SPDT BLUE
Manufacturer:
Omron
Datasheet: