A16-2 Omron, A16-2 Datasheet - Page 26
A16-2
Manufacturer Part Number
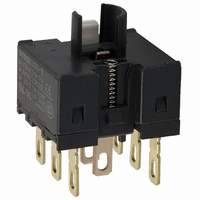
A16-2
Description
SWTCH BLOCK DPDT SOLDER TERMINAL
Manufacturer
Omron
Type
Pushbuttonr
Series
A16r
Specifications of A16-2
Accessory Type
Switch Block Replacement
No. Of Poles
2
Contact Voltage Ac Max
250V
Contact Voltage Dc Max
30V
Svhc
No SVHC (15-Dec-2010)
Contact Current Rating
5A
Terminal Type
Solder
Approval
RoHS Compliant
Illumination
Illuminated
Contact Rating
3 Amps at 250 VoltsAC, 5 Amps at 125 VoltsAC, 3 Amps at 30 VoltsDC
Mounting Style
Panel
Termination Style
Solder
Contact Current Max
5A
Switch Terminals
Solder
Rohs Compliant
Yes
For Use With
Z1398 - SWTCH KNOB RND 3POS DPDT ILL YLWZ1397 - SWTCH KNOB RND 3POS DPDT ILL REDZ1396 - SWTCH KNOB RND 3POS DPDT ILL GRNZ1395 - SWTCH KNOB RND 2POS SPDT ILL YLWZ1394 - SWTCH KNOB RND 2POS SPDT ILL REDZ1393 - SWTCH KNOB RND 2POS SPDT ILL GRNZ1392 - SWTCH KNOB RND 2POS SPDT ILL YLWZ1391 - SWTCH KNOB RND 2POS SPDT ILL REDZ1390 - SWTCH KNOB RND 2POS SPDT ILL GRNZ1389 - SWITCH KNOB RND 3-POS DPDTZ1388 - SWITCH KNOB RND 2-POS SPDTZ1387 - SWITCH KNOB RND 2-POS SPDTZ1386 - SWITCH KNB RECT 3POS DPDT ILLZ1385 - SWITCH KNB RECT 3POS DPDT ILLZ1384 - SWITCH KNB RECT 3POS DPDT ILLZ1383 - SWITCH KNB RECT 2POS SPDT ILLZ1382 - SWITCH KNB RECT 2POS SPDT ILLZ1381 - SWITCH KNB RECT 2POS SPDT ILLZ1380 - SWITCH KNB RECT 2POS SPDT ILLZ1379 - SWITCH KNB RECT 2POS SPDT ILLZ1378 - SWITCH KNB RECT 2POS SPDT ILLZ1377 - SWITCH KNOB RECT 3-POS DPDTZ1376 - SWITCH KNOB RECT 2-POS SPDTZ1375 - SWITCH KNOB RECT 2-POS SPDTZ1374 - SWITCH KNOB SQ 3-POS DPDT ILLZ1373 - SWITCH KNOB SQ 3-POS DPDT ILLZ1372 - SWITCH KNOB SQ 3-POS DPDT ILLZ1371 - SWITCH KNOB SQ 2-POS SPDT ILLZ1370 - SWITCH KNOB SQ 2-POS SPDT ILLZ1369 - SWITCH KNOB SQ 2-POS SPDT ILLZ1368 - SWITCH KNOB SQ 2-POS SPDT ILLZ1367 - SWITCH KNOB SQ 2-POS SPDT ILLZ1366 - SWITCH KNOB SQ 2-POS SPDT ILLZ1365 - SWITCH KNOB SQ 3-POS DPDTZ1364 - SWITCH KNOB SQ 2-POS SPDTZ1363 - SWITCH KNOB SQ 2-POS SPDTZ1328 - SWITCH PB ROUND MOM SPDT YELLOWZ1327 - SWITCH PB ROUND MOM SPDT WHITEZ1326 - SWITCH PB ROUND MOM SPDT REDZ1325 - SWITCH PB ROUND MOM SPDT GREENZ1324 - SWITCH PB ROUND MOM SPDT BLACKZ1323 - SWITCH PB ROUND MOM SPDT BLUEZ1322 - SWITCH PB RECT MOM DPDT YELLOWZ1321 - SWITCH PB RECT MOM DPDT WHITEZ1320 - SWITCH PB RECT MOM DPDT REDZ1319 - SWITCH PB RECT MOM DPDT GREENZ1318 - SWITCH PB RECT MOM DPDT BLACKZ1317 - SWITCH PB SQUARE MOM DPDT YELLOWZ1316 - SWITCH PB SQUARE MOM DPDT WHITEZ1315 - SWITCH PB SQUARE MOM DPDT REDZ1314 - SWITCH PB SQUARE MOM DPDT GREENZ1313 - SWITCH PB SQUARE MOM DPDT BLACKZ1312 - SWITCH PB SQUARE MOM DPDT BLUEZ1311 - SWITCH PB RND MOM DPDT ILLUM YLWZ1310 - SWITCH PB RND MOM DPDT ILLUM WHTZ1309 - SWITCH PB RND MOM DPDT ILLUM REDZ1308 - SWITCH PB RND MOM DPDT ILLUM GRNZ1307 - SWITCH PB RECT MOM DPDT ILLUMZ1306 - SWITCH PB RECT MOM DPDT ILLUMZ1305 - SWITCH PB RECT MOM DPDT ILLUMZ1304 - SWITCH PB RECT MOM DPDT ILLUMZ1303 - SWITCH PB SQ MOM DPDT ILLUM YLLWZ1302 - SWITCH PB SQ MOM DPDT ILLUM WHTZ1301 - SWITCH PB SQ MOM DPDT ILLUM REDZ1300 - SWITCH PB SQ MOM DPDT ILLUM GRN
Lead Free Status / RoHS Status
Lead free / RoHS Compliant
For Use With/related Products
A16 Series
Lead Free Status / Rohs Status
Lead free / RoHS Compliant
Other names
Z1331
Available stocks
Company
Part Number
Manufacturer
Quantity
Price

Part Number:
A16-2
Manufacturer:
OMRON/欧姆龙
Quantity:
20 000


Panel Mounting
After mounting the Pushbutton Unit (i.e., the Pushbutton and the
Case) to the panel, snap in the Switch Unit (i.e., the Switch and the
Lamp) from the back of the panel.
Mounting to the Panel
Mounting the Switch Unit
• Insert the Pushbutton Unit into the front of the panel, and fix the lock
• Make sure that the lock ring is aligned with the thread of the Case
• Tighten the mounting nuts to a torque of 0.29 to 0.49 N·m.
• Snap on the Switch Unit to the Pushbutton Unit.
• Make sure that the Switch Unit has the correct orientation when
ring and mounting nut from the terminal side.
and the edge of the lock ring is touching the panel.
snapping it onto the Case. Align the dimple on the Case with the
groove between the case guards on the NC terminal side of the
Switch Unit in the way shown below, and push the Switch Unit into
the Case until it clicks into place. Confirm that the Switch Unit is
securely in place before using.
Case
dimple
Thread
Edge
Panel
Lock ring
Groove between case guards
Mounting nut
NC terminal
Removing the Switch Unit
Note: Refer to page 21 for PCB terminals.
Engraving
Engraving the Legend Plate
Mounting and Replacing the Pushbutton
Removing and Mounting the Pushbutton
(1) Remove the Pushbutton as shown in the following diagram. If the
(2) When mounting the Operation Unit to the Case, press the entire
• Grip the part between the Switch holder of the Case and the Switch
• The characters must not be engraved deeper than 0.4 mm.
• Apply an alcohol-based paint coating, such as melamine,
Unit using the A16Z-5080 Extractor, and pull to remove the Switch
Unit.
phthalate, or acrylic resin paint coating.
Pushbutton cannot be removed by hand, use the A3PJ-5080
Extractor.
surface of the Operation Unit to surface A of the Case as shown
in the following diagram.
A16Z-5080 Extractor
Case
Operation Unit
Surface A
Pushbutton
A16
26
Related parts for A16-2
Image
Part Number
Description
Manufacturer
Datasheet
Request
R

Part Number:
Description:
SWITCH PB SQUARE MOM SPDT GREEN
Manufacturer:
Omron
Datasheet:

Part Number:
Description:
SWITCH PB SQUARE MOM SPDT WHITE
Manufacturer:
Omron
Datasheet:
Part Number:
Description:
SWITCH PB SQUARE MOM SPDT YELLOW
Manufacturer:
Omron
Datasheet:
Part Number:
Description:
SWITCH PB RECTANG MOM SPDT BLUE
Manufacturer:
Omron
Datasheet:
Part Number:
Description:
SWITCH PB RECTANG MOM SPDT YEL
Manufacturer:
Omron
Datasheet:
Part Number:
Description:
SWITCH PB SQUARE MOM SPDT BLUE
Manufacturer:
Omron
Datasheet:
Part Number:
Description:
SWITCH PB SQUARE MOM SPDT RED
Manufacturer:
Omron
Datasheet:
Part Number:
Description:
SWITCH PB RECTANG MOM SPDT GREEN
Manufacturer:
Omron
Datasheet:
Part Number:
Description:
SWITCH PB RECTANG MOM SPDT RED
Manufacturer:
Omron
Datasheet:

Part Number:
Description:
SWITCH PB RECTANG MOM SPDT WHITE
Manufacturer:
Omron
Datasheet:
Part Number:
Description:
SWITCH PB ROUND MOM SPDT BLUE
Manufacturer:
Omron
Datasheet:
Part Number:
Description:
SWITCH PB ROUND MOM SPDT GREEN
Manufacturer:
Omron
Datasheet:
Part Number:
Description:
SWITCH PB ROUND MOM SPDT RED
Manufacturer:
Omron
Datasheet:
Part Number:
Description:
SWITCH PB ROUND MOM SPDT WHITE
Manufacturer:
Omron
Datasheet:
Part Number:
Description:
SWITCH PB ROUND MOM SPDT YELLOW
Manufacturer:
Omron
Datasheet: