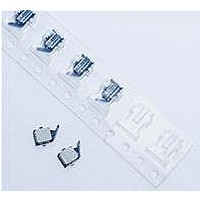
D3SH-B0L Omron, D3SH-B0L Datasheet - Page 6

D3SH-B0L
Manufacturer Part Number
D3SH-B0L
Description
Basic / Snap Action / Limit Switches Std Lever SPST-NC Lft actuate w/o boss
Manufacturer
Omron
Type
Surface Mount Detection Switchr
Series
D3SHr
Specifications of D3SH-B0L
Operating Force
31 g
Contact Form
SPST - NC
Contact Rating
1 mAmp
Actuator
Standard Lever
Termination Style
Solder
Contact Configuration
SPST-NC
Switch Terminals
Through Hole
Contact Current Max
1mA
Contact Voltage Dc Nom
5V
External Height
0.9mm
External Width
3mm
Lead Free Status / RoHS Status
Lead free / RoHS Compliant
Lead Free Status / RoHS Status
Lead free / RoHS Compliant, Lead free / RoHS Compliant
D3SH
Precautions
■
Electrical Ratings
Confirm the contact load in order to select an appropriate switch
rating.
Do not apply an excessive electrical load to the contacts, other-
wise the contacts may weld, resulting in a short circuit or burning.
Terminal Connection
Do not use flow soldering or hand soldering to solder terminals.
Conduct reflow soldering within the range shown in the terminal
temperature profile below. Some reflow soldering devices have
extremely high peak values. Do a test in advance to confirm
proper soldering conditions.
Do not conduct reflow soldering more than twice. Also provide a
time interval of at least five minutes between the first and second
reflow soldering processes to allow the Switch to return to room
temperature. Heating the Switch continuously (without an inter-
val) may cause the edges of the Switch to melt and degrade the
characteristics.
When printing for a cream solder process, a 0.13-mm screen
thickness is recommended.
Be sure to provide local ventilation.
Printed Circuit Boards
Special attention must be paid to the handling of printed circuit
boards after a Switch has been mounted onto them. Airborne
PCB particles may penetrate the interior of the Switch when
printed circuit boards are separated by cutting. Also, do not stack
printed circuit boards that have Switches mounted on them.
Product Specification Details
This document provides only a partial list of specifications. It is
recommended that you request complete drawings and specifica-
tions prior to purchasing or using the product.
6
Caution
255 ℃ MAX
220℃
150℃
Preheating time:
60 to 120 s
Heating time:
40 s max.
■
Mounting
The cover has the same electrical potential as the COM terminal.
Do not short-circuit the cover with a NO or NC terminal when
mounting the cover.
Be careful of the following points. Incorrect handling may lead to
insufficient actuator return, Switch damage, or reduced durability.
A lubricant is used in the Switch. Some of the lubricant may seep
out because the Switch does not have an airtight construction.
Consider this possibility with respect to the usage conditions
when designing or using the Switch.
Application Environment
Do not use the Switch in locations that are subject to toxic gas,
silicon, excessive dust, excessive dirt, high temperatures, high
humidity, sudden temperature changes, water splashes, or oil
splashes. Otherwise, damage resulting by faulty contact of the
Switch contacts, corrosion, or other causes, or other functional
faults may occur.
Insulation and Wiring
Be sure that the installation conditions provide a sufficient insula-
tion distance between Switch terminals and other metal parts,
lands, etc.
Cleaning
The Switch does not have an airtight construction, and it must not
be cleaned with cleaning fluids. Malfunctions may occur if the
cleaning fluid penetrates the interior of the Switch together with
flux or foreign matter from the surface of the PCB.
Confirmation with Actual Equipment
Be sure to confirm the quality of the product under the load and
environmental conditions that will be used during actual applica-
tions.
•Set the operating body in line with the direction of the actuator
•Set the Switch stroke to 70% to 100% of the overtravel (the dif-
•Do not subject the Switch to operations that involve strong im-
•Do not use the Switch as a stopper.
•Do not apply excessive loads to the cover or operate the actu-
•Do not use an adhesive to secure the Switch.
Correct Use
movement, and make sure that the operating body is com-
pletely separate from the actuator when the Switch is in the
free position (FP). When the actuator is operated from the
crosswise direction of the Switch, make sure that the corner of
the operating body has a minimum radius of R1.
ference between the operating position and the total travel po-
sition).
pact.
ator from a direction other than a specified operating direction.
Operating body
cover
R1 min
D3SH


