36650-3RFX AMPHENOL RF, 36650-3RFX Datasheet - Page 5
36650-3RFX
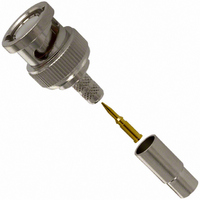
Manufacturer Part Number
36650-3RFX
Description
BNC PLUG CRIMP, PLENUM 58
Manufacturer
AMPHENOL RF
Series
BNC, RFXr
Type
Cable Plugr
Specifications of 36650-3RFX
Connector Style
BNC, RFX
Connector Type
Plug, Male Pins
Contact Termination
Crimp, Dual
Impedance
50 Ohm
Mounting Type
Free Hanging (In-Line)
Fastening Type
Bayonet Lock
Cable Group
RG-58 Plenum
Frequency - Max
4GHz
Frequency-max
4GHz
Body Style
Straight Plug
Coaxial Termination
Crimp
Rg Cable Type
58, Essex 621-715
Frequency Max
4GHz
Connector Mounting
Cable
Angle
Straight
Application
Commercial
Cable Type
RG-58
Contact Plating
Silver/Gold
Finish, Housing
Nickel
Gender
Plug
Material, Contact
Brass (Male), Beryllium Copper⁄Phosphor Bronze (Female)
Material, Dielectric
TFE
Material, Housing
Brass
Mating Type
Bayonet
Primary Type
BNC
Special Features
3-Pc
Temperature, Operating
-65 to +165 °C
Termination
Crimp
Voltage, Rating
500 V
Lead Free Status / RoHS Status
Lead free / RoHS Compliant
Features
-
Color
-
Lead Free Status / Rohs Status
RoHS Compliant part
Other names
36650-3RFX1
ARFX1041
ARFX1121
ARFX1121
ARFX1041
ARFX1121
ARFX1121


Assembly Instructions-C26b
BNC
ORIGINAL CRIMP PLUGS
Step 1
Step 2
Step 3
Step 4
Step 5
Step 6
Step 7
Amphenol Corporation Tel: 800-627-7100
Amphenol
Number
31-351
31-359
31-371
lip of boot must be firmly posi-
tioned in body groove
Connector
BNC Plug
BNC Plug
BNC Plug
Type
note: center conductor must
be visible thru contact solder
hole prior to soldering
boot
outer ferrule must
clamp nut assy
as shown
58, 141
59, 62, 140
174, 179, 187, 188, 316
outer ferrule
boot
RG-/U
Cable
a
b
cable dielectric must
butt insulator as shown
c
ferrule
Cavity for
Contact
—
—
—
302
nut assembly
Step 1 Install boot and slide outer ferrule onto cable as shown prior
Step 2 Strip cable jacket, braid and dielectric to dimensions shown.
Step 3 Slightly flare out end of cable braid as so as to facilitate
Step 4 Install ferrule clamp nut assembly onto cable so that ferrule
Step 5 Soft solder center conductor to contact using rosin core per
Step 6 Screw connector body onto prepared cable termination .
Step 7 Push body forward and into position as shown to complete
ferrule clamp
* for pneumatic crimp tool 227-60, use die sets indicated in this column
Hex Crimp Data
Outer Ferrule
Cavity for
.213(5.4)
.255(6.5)
.128(3.2)
to stripping cable.
See attached table for dimensions. All cuts are to be sharp
and square. Important: DO NOT nick braid, dielectric, and
center conductor when cutting. Tin center conductor using
soft solder per QQ-S-571 comp Sn 60. Avoid excessive heat
while tinning to prevent swelling of cable dielectric.
insertion onto ferrule clamp nut assembly. Important:
DO NOT comb out braid.
portion slides under braid and insulator butts flush against
cable dielectric. Slide outer ferrule over braid and up
against nut. Make sure no slack exists in braid. Crimp outer
ferrule with tool specified in table above, keeping cable
dielectric bottomed against insulator.
QQ-S-571 comp Sn 60. DO NOT get any solder on outside
surfaces of contact.
Wrench tighten by holding the cable nut assembly
STATIONARY while ROTATING the connector body.
assembly.
plug body assembly
Tool 227-944*
Die Set for
227-1221-11
227-1221-13
227-1221-3
.922(23.4)
.922(23.4)
.797(20.2)
Stripping Dimensions, inches (mm)
a
Amphenol
.516(13.1)
.516(13.1)
.516(13.1)
www.amphenolrf.com
b
.250(6.3)
.250(6.3)
.250(6.3)
c
®
Related parts for 36650-3RFX
Image
Part Number
Description
Manufacturer
Datasheet
Request
R


Part Number:
Description:
CONN F SOCKET R/A W/HARDWARE PCB
Manufacturer:
AMPHENOL RF
Datasheet:

Part Number:
Description:
CONN MCX JACK STR 50 OHM SMD
Manufacturer:
AMPHENOL RF
Datasheet:

Part Number:
Description:
CONN BNC JACK R/A 75 OHM PCB
Manufacturer:
AMPHENOL RF
Datasheet: