FLUKE-289/FVF Fluke Electronics, FLUKE-289/FVF Datasheet - Page 25
FLUKE-289/FVF
Manufacturer Part Number
FLUKE-289/FVF
Description
COMBO KIT DMM & ACCESSORY
Manufacturer
Fluke Electronics
Series
FlukeView® Forms, 28xr
Type
Digital (DMM)r
Datasheet
1.FLUKE-289.pdf
(88 pages)
Specifications of FLUKE-289/FVF
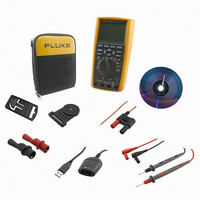
Includes
Battery, Case, Clips, Software, Temperature Probe, Test Leads
Style
Handheld
Display Digits
4.5
Display Type
LCD, Bar Graph
Display Count
50000
Function
Voltage, Current, Resistance, Capacitance, Temperature, Frequency
Functions, Extra
Continuity, dB
Features
Data Logging, Hold, Memory, Min/Max/Ave
Ranging
Auto/Manual
Response
True RMS
Lead Free Status / RoHS Status
Not applicable / RoHS non-compliant
Other names
289/FVF
614-1063
614-1063


press 5 to scroll the screen horizontally and reveal the off-screen
menu items. Conversely, with the menu selector on an item in
the right-hand column, press 6 to reveal the off-screen menu
items.
Input Alert™ Feature
If a test lead is plugged into the mA/ A or A terminal, but the
rotary switch is not set to the correct current position, the beeper
warns you by making a chirping sound and displays “Leads
connected incorrectly”. This warning is intended to stop you from
attempting to measure voltage, continuity, resistance,
capacitance, or diode values when the leads are plugged into a
current terminal.
Using the Info Button
While operating the Meter, more information about a selected
function, a front-panel button, or a menu item may be necessary.
Press I to open an information window that lists topics
covering the functions and modifiers that are available at the time
the button is pressed. Each topic provides a brief explanation on
a Meter function or feature.
To avoid circuit damage and possibly blowing the
Meter’s current fuse, do not place the probes
across (in parallel with) a powered circuit when a
lead is plugged into a current terminal. This
causes a short circuit because the resistance
through the Meter's current terminals is very low.
XW Warning
The information revealed through I is not meant to replace
the more detailed information found in this manual. Function and
feature explanations are brief and only meant to refresh a
person’s memory.
The number of information topics displayed at any one time may
exceed the display area. Use the softkeys labeled Next and Prev
to move from topic to topic. Use the softkey labeled More or 7
and 8 to scroll through the information a full screen at a time.
Pressing the softkey labeled Close, or I will close the
information window.
Hold and AutoHold Mode
To freeze the display for any function, press H. Only the mini-
measurement display and hazardous voltage icon (z) continue to
indicate the actual input. The battery level indicator is also active.
The Meter’s softkeys are relabeled for saving the frozen reading
or activating the AutoHold mode.
If H is pressed while MIN MAX record, peak record, or a
recording session is in progress, the display freezes but the data
acquisition continues in the background. Pressing H again
updates the display to reflect data that was acquired during the
hold.
Pressing the softkey labeled AutoHOLD activates AutoHold if
the Meter is not in the Peak, MIN MAX, or Record modes.
AutoHold operation monitors the input signal and updates the
display and, if enabled, sounds the beeper, whenever a new
stable measurement is detected. A stable measurement is one
that does not vary more than a selected adjustable percentage
(AutoHold threshold) for at least one second. The Meter filters
Input Alert™ Feature
15