CAT-HT-169-1620-11 Samtec Inc, CAT-HT-169-1620-11 Datasheet - Page 3
CAT-HT-169-1620-11
Manufacturer Part Number
CAT-HT-169-1620-11
Description
CAT
Manufacturer
Samtec Inc
Series
Power Mate® CC69Lr
Datasheet
1.CAT-HT-169-1620-11.pdf
(4 pages)
Specifications of CAT-HT-169-1620-11
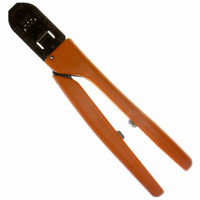
Tool Type
Hand Crimper
Features
Side Entry, Ratchet
For Use With/related Products
Rectangular Contacts, 16-20 AWG
For Use With
CC69L-1620-01-T-SP - CONN SOCKET CONT 16-20AWG TINCC69R-1620-01-T-SP - CONN CONTACT 16-20AWG TIN
Lead Free Status / RoHS Status
Other names
Q3095272A


This inspection requires the use of micrometer with a
modified anvil as shown in Figure 4.
A recommended Crimp Height Comparator is
RS–1019–5LP, which can be purchased from:
Proceed as follows:
The ratchet feature on these hand tools should be
checked to ensure that the ratchet does not release
2. Close tool handles until the ratchet releases and
then allow the handles to open freely. If they do not
open quickly and fully, the spring is defective and
must be replaced.
3. Inspect the head assembly for worn, cracked, or
broken jaws. If damage is evident, return it for
evaluation and repair.
1. Select a contact and a wire (maximum size) for
each crimp section.
2. Refer to the Section 3, and crimp the contact(s).
3. Using a crimp height comparator, measure wire
barrel crimp height as shown in Figure 4. If the
crimp height conforms to that marked on the tool,
the tool is considered dimensionally correct.
Figure 4
prematurely, allowing the crimping dies to open before
they have fully bottomed. Obtain a 0.025–mm
[.001–in.] shim that is suitable for checking the
clearance between the bottoming surfaces of the
crimping dies. Proceed as follows:
Proceed as follows:
Refer to Figure 5 for tool dimensions.
Since the previous release of this document, the
following changes have been made:
1. Select the maximum size wire and strip it
according to the dimensions listed in the drawing
shipped with the tool.
2. Select the contact and crimp section
corresponding to the selected wire size (refer to
the drawing shipped with the tool).
3. Position the contact and wire in the crimping
dies, as described in Section 3, CRIMPING
PROCEDURE.
4. Hold the wire in place and squeeze the handles
until the ratchet releases. Hold the handles in this
position, maintaining just enough tension to keep
the dies closed.
5. Check the clearance between the bottoming
surfaces of the wire crimper and the wire anvil. See
Figure 1. If the clearance is 0.025 mm [.001 in.] or
less (on at least two of the bottoming surfaces), the
ratchet is satisfactory. If clearance exceeds
0.025 mm [.001 in.], the ratchet is out of
adjustment and must be repaired.
Updated document to corporate requirements
Changed views in Figure 5
Changed titles in table in Figure 2
Related parts for CAT-HT-169-1620-11
Image
Part Number
Description
Manufacturer
Datasheet
Request
R

Part Number:
Description:
CAT
Manufacturer:
Samtec Inc
Datasheet:
Part Number:
Description:
SAMTEC CATALOGUE JUNE2012
Manufacturer:
Samtec Inc
Part Number:
Description:
2011 SAMTEC FULL LINE CATALOGUE
Manufacturer:
Samtec Inc
Part Number:
Description:
Customer specified Board Stacker, 2x03, pitch 2.00mm, SMD, T&R
Manufacturer:
Samtec Inc
Part Number:
Description:
polarized micro socket, 19pos., pitch 1mm, alignment pin, p&p pad, SMD
Manufacturer:
Samtec Inc
Part Number:
Description:
Basic Socket Strip, 2x20 pos., pitch0.80mm, SMD
Manufacturer:
Samtec Inc
Part Number:
Description:
low profile dual wipe socket, 2x12pos., pitch 1,27mm, bottom entry, SMD
Manufacturer:
Samtec Inc
Part Number:
Description:
Dust Cap for RPBE Ethernet Socket
Manufacturer:
Samtec Inc
Part Number:
Description:
ELEVATED SOCKET STRIP CENTERLINE: .100 (2,54MM)
Manufacturer:
Samtec Inc