30055 Parallax Inc, 30055 Datasheet - Page 4
30055
Manufacturer Part Number
30055
Description
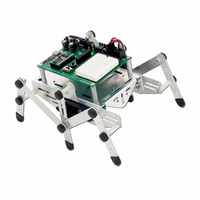
KIT CRAWLER FOR BOE-BOT
Manufacturer
Parallax Inc
Datasheet
1.30055.pdf
(7 pages)
Specifications of 30055
Accessory Type
Hobby and Education
Product
Microcontroller Accessories
Lead Free Status / RoHS Status
Lead free / RoHS Compliant
For Use With/related Products
Boe-Bot®
Lead Free Status / Rohs Status
Lead free / RoHS Compliant
Available stocks
Company
Part Number
Manufacturer
Quantity
Price
Company:

Part Number:
30055
Manufacturer:
ANAREN
Quantity:
5 000
Company:
Part Number:
30055
Manufacturer:
ANAREN
Quantity:
12 800
Part Number:
30055
Manufacturer:
ANAREN
Quantity:
20 000


4
Step #5
Item
(K)
(Q)
Step #6
Item
(E)
(L)
(N)
(Q)
© Parallax, Inc. 2004 - Crawler Kit for Boe-Bot Robot Manual
L
Q
(2)
Qty
(2)
Qty
(8)
(4)
(4)
(4)
E
C
C
Description
Plastic Screw Covers
Description
M3x10 Phillips Pan Head Screw
Nylon Lock Nuts
Plastic screw covers
Installing Middle Legs
3Mx12 Phillips Pan Head Screw
Connecting Push arms to Legs
Nylon washers
E
G
G
N
Q
Fig #12
K
Fig #10
K
H
H
N
K
G
G
E
Q
C
C
E
Q
L
Use Fig #12 as a guide to connect push Arms (G) to Legs
(C). Be sure Push Arms are aligned as shown in Fig #11.
Insert screws (L) through screw covers (Q). Next insert
screw through hole of Leg (C), then through a Nylon Washer
(E), and through the push arm (G). Next insert the screw
through another Nylon Washer and tighten with a Locknut
(N) from back of the Push Arm. Tighten until legs can just
move freely but are not sloppy. Before moving on, position
the pieces exactly as they appear in Fig #13 and Fig #14.
Double check your work then proceed to Step #7.
Use Fig #10 as a guide to install the middle leg assembly
just built.
Insert Screws (K) through Screw Covers (Q). Insert the
Screw through the long slide hole of the Leg assembly.
Screw into standoff (H). Tighten until each leg can slide
freely but is not sloppy. Before moving on, position the
pieces exactly as they appear in Fig #11 with the top
Push Arm to the right. Double check your work then
proceed to Step #6.
Fig #13
Fig #11
Fig #14
Must Be on
These Two
Push Arms
Top
Related parts for 30055
Image
Part Number
Description
Manufacturer
Datasheet
Request
R


Part Number:
Description:
Microcontroller Modules & Accessories DISCONTINUED BY PARALLAX
Manufacturer:
Parallax Inc

Part Number:
Description:
BOOK UNDERSTANDING SIGNALS
Manufacturer:
Parallax Inc
Datasheet:


Part Number:
Description:
COMPETITION RING FOR SUMOBOT
Manufacturer:
Parallax Inc
Datasheet:


Part Number:
Description:
TEXT INFRARED REMOTE FOR BOE-BOT
Manufacturer:
Parallax Inc
Datasheet:
Part Number:
Description:
BOARD EXPERIMENT+LCD NX-1000
Manufacturer:
Parallax Inc
Datasheet:

Part Number:
Description:
CONTROLLER 16SERVO MOTOR CONTROL
Manufacturer:
Parallax Inc
Datasheet:

Part Number:
Description:
BASIC STAMP LOGIC ANALYZER
Manufacturer:
Parallax Inc
Datasheet:

Part Number:
Description:
IC MCU 2K FLASH 50MHZ SO-18
Manufacturer:
Parallax Inc
Datasheet: