F990SLIDEREK Silicon Laboratories Inc, F990SLIDEREK Datasheet - Page 2
F990SLIDEREK
Manufacturer Part Number
F990SLIDEREK
Description
EVAL CAPACITIVE TOUCH SLIDER
Manufacturer
Silicon Laboratories Inc
Series
QuickSense™r
Specifications of F990SLIDEREK
Sensor Type
Touch, Capacitive
Sensing Range
Slider
Voltage - Supply
3V
Embedded
Yes, MCU, 8-Bit
Utilized Ic / Part
C8051F990
Processor To Be Evaluated
C8051F990
Processor Series
C8051F99x
Data Bus Width
12 bit
Operating Supply Voltage
3 V
Lead Free Status / RoHS Status
Lead free / RoHS Compliant
Interface
-
Sensitivity
-
Lead Free Status / Rohs Status
Lead free / RoHS Compliant
Other names
336-1962


F990-Slider-EK UG
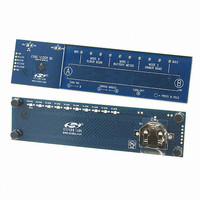
3. C8051F990 Slider Evaluation Kit Demo
The C8051F990 Slider Evaluation Board is ready to use out of the box. Simply lay the board on a flat surface,
remove the paper tab to allow the battery to make contact with the battery holder, touch the A button on the left side
of the slider, and slowly slide your finger towards the B button on the right side of the slider. Once the system turns
on, the two LEDs corresponding to “Mode 0: Slider Demo” will flash four times indicating that the system is in slider
demo mode. The slider board has three modes: “Mode 0: Slider Demo”, “Mode 1: Battery Meter”, and “Mode 2:
Dimmer Demo”. The user may cycle through the modes by performing a “pinch” gesture. The slider may be
pinched by placing one finger on the A button and another finger on the B button then simultaneously sliding both
fingers towards the middle of the slider.
3.1. Mode 0: Slider Demo
In the slider demo, the LED will track finger position on the slider for a slowly moving finger. If the finger performs a
gliding motion across the slider, then the LED will continue moving in the direction of the glide. The LED will act as
a ball in motion and will continue rotating until it is stopped. The LED may be stopped by pressing one finger on the
slider. If two fingers are placed on the slider, the LED will stop faster. If the finger generates additional fast gliding
motions on the slider, then the enabled LED will start rotating faster through the bank of LEDs. If left alone, the
rotating LED will slow down until it comes to a complete stop. This simulates the force of friction on a moving ball.
3.2. Mode 1: Battery Meter
In battery meter mode, the system measures the battery voltage and slowly blinks an LED to indicate the
approximate battery life remaining. If the MAX LED is blinking, then the battery is fully charged. If the MIN LED is
blinking, then the battery is nearly depleted and it is time to replace the battery. From the slider demo mode, the
system will enter battery meter mode when the slider is pinched once. After entering battery meter mode, the
system will remain in this mode for approximately 10 seconds. The system may be held in battery meter mode for
longer than 10 seconds by touching the slider. The system will remain in battery meter mode as long as the slider
is touched. Upon exit from battery meter mode, the system goes back into slider demo mode.
3.3. Mode 2: Dimmer Demo
The dimmer demo mode allows the user to set the LED brightness. If the MAX LED is lit, the dim level is set at
maximum brightness. If the MIN LED is lit, the dim level is set at minimum brightness. The LED brightness set by
the dimmer demo is preserved and used throughout all three modes. To enter dimmer mode from the slider demo
mode, pinch the slider twice and wait for the “Mode 2: Dimmer Demo” LEDs to stop blinking. Then, touch the slider
at the desired position to set the LED brightness. The selected position will be saved 5 seconds after removing
your finger from the slider. At that time, the system will automatically switch back to the slider demo mode.
Note: The “pinch” gesture detection is disabled once the system enters dimmer mode.
3.4. Turning Off the Board
The C8051F990 slider board will automatically turn off if the slider is not touched in 60 seconds. You may also turn
off the slider board by holding down the B button for 3 seconds.
Important Note: The back side of the slider board is sensitive to touch. The slider board should be placed on a flat
surface while in use to prevent the PCB traces on the back from being accidentally touched. If the back side is
accidentally touched, or after the board is taken out of a static bag, let it sit for 30 seconds on a flat surface to allow
the baselining algorithm to adapt to its new environment.
2
Rev. 0.2
Related parts for F990SLIDEREK
Image
Part Number
Description
Manufacturer
Datasheet
Request
R

Part Number:
Description:
SMD/C°/SINGLE-ENDED OUTPUT SILICON OSCILLATOR
Manufacturer:
Silicon Laboratories Inc
Part Number:
Description:
Manufacturer:
Silicon Laboratories Inc
Datasheet:
Part Number:
Description:
N/A N/A/SI4010 AES KEYFOB DEMO WITH LCD RX
Manufacturer:
Silicon Laboratories Inc
Datasheet:
Part Number:
Description:
N/A N/A/SI4010 SIMPLIFIED KEY FOB DEMO WITH LED RX
Manufacturer:
Silicon Laboratories Inc
Datasheet:
Part Number:
Description:
N/A/-40 TO 85 OC/EZLINK MODULE; F930/4432 HIGH BAND (REV E/B1)
Manufacturer:
Silicon Laboratories Inc
Part Number:
Description:
EZLink Module; F930/4432 Low Band (rev e/B1)
Manufacturer:
Silicon Laboratories Inc
Part Number:
Description:
I°/4460 10 DBM RADIO TEST CARD 434 MHZ
Manufacturer:
Silicon Laboratories Inc
Part Number:
Description:
I°/4461 14 DBM RADIO TEST CARD 868 MHZ
Manufacturer:
Silicon Laboratories Inc
Part Number:
Description:
I°/4463 20 DBM RFSWITCH RADIO TEST CARD 460 MHZ
Manufacturer:
Silicon Laboratories Inc
Part Number:
Description:
I°/4463 20 DBM RADIO TEST CARD 868 MHZ
Manufacturer:
Silicon Laboratories Inc
Part Number:
Description:
I°/4463 27 DBM RADIO TEST CARD 868 MHZ
Manufacturer:
Silicon Laboratories Inc
Part Number:
Description:
I°/4463 SKYWORKS 30 DBM RADIO TEST CARD 915 MHZ
Manufacturer:
Silicon Laboratories Inc
Part Number:
Description:
N/A N/A/-40 TO 85 OC/4463 RFMD 30 DBM RADIO TEST CARD 915 MHZ
Manufacturer:
Silicon Laboratories Inc
Part Number:
Description:
I°/4463 20 DBM RADIO TEST CARD 169 MHZ
Manufacturer:
Silicon Laboratories Inc