3-231652-0 Tyco Electronics, 3-231652-0 Datasheet

TOOL 8POS CRIMP MOD PLUGS CAT 5

3-231652-0

Manufacturer Part Number
3-231652-0
Description
TOOL 8POS CRIMP MOD PLUGS CAT 5
Manufacturer
Tyco Electronics
Datasheets

Specifications of 3-231652-0

Tool Type
Hand Crimper, Cutter, Stripper
Features
Front Entry, Ratchet
Color
White
Product
Tools
Lead Free Status / RoHS Status
Not applicable / Not applicable
For Use With/related Products
Modular - RJ45 (8p8c)
For Use With
A100168 - CONN PLUG SHIELD FOR SOLID WIREA100167 - CONN PLUG SHIELD FOR STRAND WIREA100166 - CONN PLUG UNSHIELDED SOLID WIREA100165 - CONN PLUG UNSHIELD STRANDED WIREA98815 - CONN PLUG KIT UNSHLD RJ45 STRANDA98814 - CONN PLUG KIT SHIELD RJ45 STRANDA98813 - CONN PLUG KIT SHIELD RJ45 SOLIDA98820 - CONN PLUG KIT UNSHLD RJ45 SOLID
Lead Free Status / Rohs Status
Lead free / RoHS Compliant
Other names
A9929
1. INTRODUCTION
Modular Plug Hand Tools 231652-[ ] (shown in
Figure 1) are designed to terminate modular plug
connectors onto stranded or solid, shielded or
unshielded flat oval cable or round cable. The tool also
cuts and strips unshielded flat oval cable. Other cable
must be prepared by separate tools.
Each tool includes Die Set 853400-[ ] (see Figure 2),
except Tool 2-231652-0 which is available without a
die set. The die sets are also available separately.
Reasons for reissue of this instruction sheet are
provided in Section 8, REVISION SUMMARY.
©2011 Tyco Electronics Corporation, a TE Connectivity Ltd. Company
All Rights Reserved
*Trademark
TE Connectivity, TE connectivity (logo), and TE (logo) are trademarks. Other logos, product and/or Company names may be trademarks of their respective owners.
PROPER USE GUIDELINES
Cumulative Trauma Disorders can result from the prolonged use of manually powered hand tools. Hand tools are intended for occasional use
and low volume applications. A wide selection of powered application equipment for extended-use, production operations is available.
Cable Cutter
Indenter (Die)
Color Code Dot
Flat Oval
Cable Stripper
NOTE
i
All numerical values in this instruction sheet are in
metric units [with U.S. customary units in brackets].
Dimensions are in millimeters [and inches]. Figures
are not drawn to scale.
CAUTION
!
Die Holding
Screw
Figure 1
Ratchet
Release
(Pawl)
Handle
CAUTION: DO NOT cycle the
tool without a die in place;
otherwise damage to the
stripping blades may occur.
Modular Plug Hand Tools
(Premium Grade) 231652-[ ]
TOOLING ASSISTANCE CENTER 1-800-722-1111
PRODUCT INFORMATION 1-800-522-6752
Ratchet
Nest (Die)
Color Code
Dot
2. DESCRIPTION
The die set consists of a nest and an indenter, each
marked with a color-code dot. The die set is held in the
tool by a single die-holding screw. Each die set is
unique to its purpose, but die sets can be
interchanged to accommodate any modular plug.
Refer to Figure 2.
The tool features a wire cutter and flat oval cable
stripper to prepare unshielded flat oval cable. The tool
handle ensures full crimping. Once engaged, the
ratchet will not release until the handles have been
FULLY closed, unless the ratchet release (pawl) is
depressed to manually release the ratchet. When
depressed, the pawl prevents crimping of an
improperly positioned modular plug.
This controlled document is subject to change.
For latest revision and Regional Customer Service,
visit our website at www.te.com
(FIgure1)
Figure 2
Instruction Sheet
408-9767
08 APR 11 Rev M
1 of 7
LOC B

3-231652-0 Summary of contents

Page 1

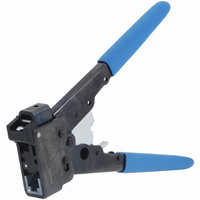
... The tool also cuts and strips unshielded flat oval cable. Other cable must be prepared by separate tools. Each tool includes Die Set 853400-[ ] (see Figure 2), except Tool 2-231652-0 which is available without a die set. The die sets are also available separately. ...

Page 2

... Insert trimmed cable into STRIP slot in tool flat oval cable stripper until cable butts against die cable stop. 3. Close handles to last ratchet stop, but DO NOT release them. Pull cable straight out of tool. Then release tool handles. DO NOT squeeze handles together while pulling NOTE cable out ...

Page 3

... Figure 4 Rev M 408-9767 Figure ...

Page 4

... Squeeze tool handles until ratchet releases. 2. Using a small flat blade screwdriver or cross- recessed screwdriver, remove the die holding screw (turn the screw counterclockwise). 3. Using the screwdriver, push the die set out of the tool. 4. Insert the die set with the color dots facing outward as shown in Figure 1. ...

Page 5

... Rev M 2. Position new blades onto tool with beveled edges facing inward. 3. Install and tighten screws. Adjust flat oval cable stripper according to Paragraph 5.2. DO NOT cycle the tool without a die in place; CAUTION otherwise, damage to the stripping blades may occur ...

Page 6

... Squeeze tool handles together slowly, while watching to ensure indenter bottoms against nest. 3. Release handles to open die set, and remove terminated modular plug assembly. 4. Test for proper crimp height according to Section 4, Step 4. If plug crimp height is within acceptable limits, lightly lubricate the tool and die set, and place it back into service ...

Page 7

... PART NUMBER 1 993314-1 2 4.23619-8 3 21045-3 4 2-23620-5 5 21045-6 6 853400-[ ] † 7 2-231652-0 8 21045-1 9 768522-1 10 231662-4 † Refer to Figure 2 for cross-refeerence of tools to die set part numbers. KIT PART NUMBER BLADE REPLACEMENT KIT -- Blade Set-Up Gage, 4 Pan Head Screws, 1 Cutter Blade Screw, 5 Wire Cutter Blades, 5 Fixed ...