90547-1 Tyco Electronics, 90547-1 Datasheet
90547-1
Specifications of 90547-1
A25161


90547-1 Summary of contents
Page 1
... Figures i and illustrations are for identification only and are not drawn to scale. E2011 Tyco Electronics Corporation Connectivity Ltd. Company All Rights Reserved TE logo is a trademark. *Trademark. Other product names, logos, or company names might be trademarks of their respective owners. ...
Page 2
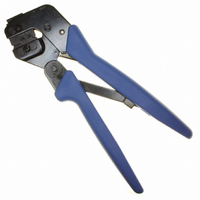
... Continue closing the tool handles until the ratchet in the tool frame has engaged sufficiently to hold the anvils and crimpers in place, then tighten both die retaining screws. 9. Place the locator assembly over the end of the long screw, and position the locator assembly against the side of the tool jaw ...
Page 3
If adjustment is required, loosen the screw that holds the contact support onto the locator assembly. The ratchet has detents that create audible clicks NOTE as the tool handles are closed Place a contact with wire into ...
Page 4
Make sure that both sides of the insulation barrel CAUTION are started evenly into the crimping section NOT attempt to crimp an improperly positioned contact. 4. Hold the contact in position and squeeze the tool handles together until ...
Page 5
... Order the repair kit and replaceable parts through your TE representative, or call 1--800--526--5142, or Rev D send a facsimile of your purchase order to 1--717--986--7605, or write to: CUSTOMER SERVICE (38--35) TYCO ELECTRONICS PO BOX 3608 HARRISBURG PA 17105--3608 11.REVISION SUMMARY Revisions to this instruction sheet include: Updated document to corporate requirements. ...
Page 6
... Die Assembly 90546- 2 Can Be Used In the Following Tools: PRO- CRIMPER III Hand Tool 354940- 1 (Instruction Sheet 408- 9930) SDE Bench Terminator 1490076- 2 (Customer Manual 409- 10052) Battery Tool (Shouldered Die) 1725837 (Customer Manual 409- 10053 SDE PEW- 12 Hand Tool 9- 1478240- 0 (Instruction Sheet 408- 8851) ...