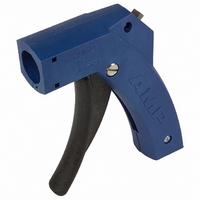
58074-1 Tyco Electronics, 58074-1 Datasheet - Page 2

58074-1
Manufacturer Part Number
58074-1
Description
TOOL MANUAL FOR SHELL CONNECTORS
Manufacturer
Tyco Electronics
Series
Pistol Grip IIr
Type
Hand Toolr
Specifications of 58074-1
Tool Type
Handle, Frame - without Die Set
For Use With
58246-3 - TOOL HEAD ASSY FOR MTA-100231894-1 - TOOL HEAD ASSEMBLY 18-22AWG IDC58082-1 - TOOL HEAD TERMINATING ONLYA30528 - TOOL HEAD ASSEMBLY MTA .156A99129 - TOOL HEAD ASSEM 2MM TERMINATERA28718 - HEAD (IDC) MODU MTE W/O TLA9973 - TOOL HEAD ASSEMBLY RCPT MTA 100A1999 - HEAD ASSEM TOOL FOR MTA-156 RECPA1998 - HEAD ASSEM TOOL FOR MTA-100 RECPA2032 - HEAD ASSEMBLY TOOL FOR D-SUB CONA2040 - HEAD ASSEMBLY TOOL FOR AMP MT CO
Lead Free Status / RoHS Status
Not applicable / Not applicable
For Use With/related Products
Varies by Die Set
Lead Free Status / Rohs Status
Lead free / RoHS Compliant
Other names
A2031
4. MAINTENANCE AND INSPECTION
It is recommended that a maintenance and inspection
program be performed periodically to ensure
dependable and uniform terminations. Though
recommendations call for at least one inspection a
month, frequency of inspection depends on:
The handle assembly is inspected before being
shipped; however, it is recommended that the handle
assembly be inspected immediately upon arrival to
ensure that the handle assembly has not been
damaged during shipment.
4.1. Daily Maintenance
Each operator should be aware of, and responsible
for, the following:
Rev C
1. The care, amount of use, and handling of the
handle assembly.
2. The presence of abnormal amounts of dust and
dirt.
3. The degree of operator skill.
4. Your own established standards.
1. Remove dust, moisture, and other contaminants
with a clean brush, or soft, lint-free cloth. DO NOT
use objects that could damage the handle
assembly.
2. Ensure that all components are in place and
properly secured.
3. With the terminating head in place, squeeze and
release the cam handle to ensure that the
mechanisms move smoothly.
4. Depress and release the spring-loaded ratchet
pawl to ensure that the pawl moves freely.
5. Check the extension springs to ensure they are
properly located and are not deformed.
4.2. Periodic Inspection
5. REPLACEMENT AND REPAIR
Customer-replaceable parts are listed in Figure 3.
A complete inventory can be stocked and controlled to
prevent lost time when replacement of parts is
necessary. Parts other than those listed should be
replaced by Tyco Electronics Corporation to ensure
quality and reliability of the handle assembly. Order
replacement parts through your representative, or call
1-800-526-5142, or send a facsimile of your purchase
to 717-986-7605, or write to:
For customer repair service, call 1-800-526-5136.
6. REVISION SUMMARY
Since the previous release of this instruction sheet,
the new company logo has been applied.
1. Remove any accumulated film with a suitable
cleaning agent that will not affect plastic material.
2. Make sure all components are in place and are
properly secured. Check the handle assembly for
chipped, cracked, worn, or broken areas. If damage
is evident, repair is necessary. See Section 6,
REPLACEMENT AND REPAIR.
CUSTOMER SERVICE (038-035)
TYCO ELECTRONICS CORPORATION
PO BOX 3608
HARRISBURG PA 17105-3608
408-6790
2 of 3


