E2CY-T11 Omron, E2CY-T11 Datasheet - Page 15
E2CY-T11
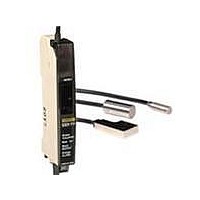
Manufacturer Part Number
E2CY-T11
Description
AMP 12-24VDC 3-WIRE NPN FOR E2CY
Manufacturer
Omron
Series
E2CYr
Specifications of E2CY-T11
Amplifier Type
Standard
Voltage - Supply
12 V ~ 24 V
Output Type
NPN
Current - Supply
40mA
Mounting Type
Bracket Mount
Lead Free Status / RoHS Status
Lead free / RoHS Compliant
Other names
E2CYT11


J MUTUAL INTERFERENCE
If more than one Sensor is positioned face-to-face or in parallel,
be sure to maintain enough space, as provided in the following
table, between adjacent Sensors to suppress mutual
interference.
J AMPLIFIER UNIT MOUNTING AND
Mounting
1. Place the front part of the Amplifier Unit on the mounting
2. Press the rear part of the Amplifier Unit onto the mounting
If the Amplifier Unit is side-mounted to the bracket provided,
secure it using M3 screws with flat washers (6 mm in dia., or
less).
E2CY
Front part
Model
E2CY-X1R5A
E2CY-C2A
E2CY-V3A
bracket provided with the E2CY or the DIN track so that the
front part will engage with the mounting bracket or DIN track.
bracket or DIN track.
REMOVAL
Flat washers (6 dia. max. each)
(1)
Rear part
DIN track (or mounting bracket)
(2)
Distance (mm)
A
20
20
30
Fixture rail (yellow)
B
15
15
12
Removal
Press the Amplifier Unit in the direction shown by arrow (3) in the
following illustration and lift up the fiber insertion part of the
Amplifier Unit in the direction shown by arrow (4), so the Amplifier
Unit can be removed easily. No screwdriver is required to remove
the Amplifier Unit.
J TEACHING
Make sure that the Sensor is in operating condition before
making sensitivity adjustments.
J PROCESSING THE SENSOR CABLE
When cutting or extending the cable, the end of the sensor cable
connected to the E2CY-j must be processed as shown in the
following illustration.
Note:*1. Be sure to turn over the braided shield so that none of
J POWER ON OPERATION
•
•
J EFFECT OF HIGH-FREQUENCY
If the E2CY is located near a high-frequency generation unit or
transceiver, it may be affected by such a unit and result in
malfunction.
Sensor cable
The E2CY will be ready for sensing within 50 ms after the
power is turned ON.
When the E2CY and load are connected to different power
supplies, you must turn ON the power supply to the E2CY
first.
ENDS
ELECTRO-MAGNETIC FIELD
*2. Make sure that a minimum of 2.5 mm of cable
(4)
its thin wires are left.
insulation is maintained.
DIN track
(3)
14 max.
*1
*2
7 to 8
4 to 5
E2CY
15
Related parts for E2CY-T11
Image
Part Number
Description
Manufacturer
Datasheet
Request
R

Part Number:
Description:
Proximity Sensors NON-FERROUS PROX HEA D FLAT
Manufacturer:
Omron
Datasheet:

Part Number:
Description:
Proximity Sensors NON-FERROUS PROX HEA D M5
Manufacturer:
Omron
Datasheet:
Part Number:
Description:
Proximity Sensors NON-FERROUS PROX HEA D 8MM DMTR
Manufacturer:
Omron
Datasheet:
Part Number:
Description:
Proximity Sensors E2CY-C1R5A SPECIAL W 3M CABLE
Manufacturer:
Omron

Part Number:
Description:
AMP NPN 10-30VDC FOR E2C PROX
Manufacturer:
Omron
Datasheet:

Part Number:
Description:
AMP NPN 10-30VDC FOR E2C-CR5B
Manufacturer:
Omron
Datasheet:
Part Number:
Description:
AMP PNP 10-30VDC FOR E2C PROX
Manufacturer:
Omron
Datasheet:
Part Number:
Description:
AMP PNP 10-30VDC FOR E2C-CR5B
Manufacturer:
Omron
Datasheet:
Part Number:
Description:
AMP 10-30VDC NPN/PNP FOR E2C
Manufacturer:
Omron
Datasheet:

Part Number:
Description:
DC AMP NPN FOR E2C PROX
Manufacturer:
Omron
Datasheet:
Part Number:
Description:
DC AMP For M8 E2C-H HiTemp PRX
Manufacturer:
Omron
Datasheet:
Part Number:
Description:
DC AMP, M18 E2C-H HiTemp PROX
Manufacturer:
Omron
Datasheet:
Part Number:
Description:
SEP.AMP.PROX. M18, 10mm DIST
Manufacturer:
Omron
Datasheet: