EVAL_PAN4555 Panasonic - ECG, EVAL_PAN4555 Datasheet - Page 9
EVAL_PAN4555
Manufacturer Part Number
EVAL_PAN4555
Description
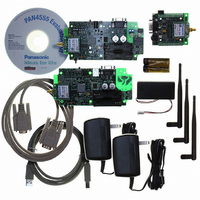
ZIGBEE DEVELOPMENT KIT PAN4555
Manufacturer
Panasonic - ECG
Series
PAN4555r
Type
Zigbeer
Datasheets
1.EVAL_PAN4555ETU.pdf
(16 pages)
2.EVAL_PAN4555.pdf
(30 pages)
3.EVAL_PAN4555.pdf
(2 pages)
Specifications of EVAL_PAN4555
Frequency
2.4GHz
For Use With/related Products
PAN4555
Lead Free Status / RoHS Status
Lead free / RoHS Compliant
Other names
EVAL_PAN4555
P14157
Q3510557
P14157
Q3510557


CLASSIFICATION
Einstufung
SUBJECT
Thema
CUSTOMER’S CODE
EvalPAN4555
8.1.
Panasonic Electronic Devices (EUROPE) GmbH
1.
2.
3.
4.
5.
6.
7.
8.
9.
10.
11.
12.
13.
14.
15.
16.
17.
FLASHING AND SERIAL UPLOAD INSTRUCTIONS
Remark: Installation of the embedded bootloader and upload of the test software to
European Technology Center
installed.
OFF. Connect the testboard via a serial cable to the PC. Start the Freescale TestTool
Wait several seconds until a board type window appears. Select 13213-NCB and OK.
From the Application files displayed select
“EVK_PTC_Demo_w_Embedded_Bootloader_V202_13213_NCB” and “UPLOAD”.
The upload progress is shown on the display with the final the message
“Firmware downloaded – resets system”
The LEDs D13 and D14 should be lit permanently now.
Download and install the required Software for USB HCS08/HCS12 Multilink adapter
USB-ML-12. See also folder 132xxEVKCD\Drivers\P&E USB device.
Plug the PAN4555 carrierboard on the testboard and switch the testboard power ON
Connect the USB HCS08/HCS12 Multilink adapter to the BDM connector on the
testboard and via USB to the PC where the flash programming software is
Start the HCS08 Flash Programmer and select as port the P&E HCS08/HCS12 Multilink
Select the 9S08GT60.S8P Algorithm to be used
Wait for the Flashing Utility to become ready
Erase the PAN4555 flash memory
Select the \embedded_bootloader\embedded_bootloader_4555.s19 file from the CD
Choose “program” to flash it into the PAN4555
Wait for completion of the programming algorithm
After removing the BDM connector push RESET on the Testboard.
Set the COM1 switch on the testboard to UART1, e. g. switch 1 and 3 ON and all others
Select Tools / Communication Settings / Add Internal with the COM Port you have the
Board connected to and as Baudrate choose 19200, then close the Window
Now select View / Embedded Bootloader and choose the COM Port you want to use
Close the Embedded Bootloader and open VIEW\ZigBee Radio Test
Check a “Device Ready”, a “Ping” has to result in “Hello”
Now the devices are ready for a test as in part 9.2
PAN4555 is already done and only required for re-installation
EvalBoard PAN4555
PANASONIC’S CODE
PRELIMINARY
APPROVED
genehmigt
No.
DS-Eval4555-2400
PAGE
Seite
DATE
Datum
CHECKED
geprüft
30.03.2007
9 of 16
DESIGNED
Erstellt
REV.
01
Related parts for EVAL_PAN4555
Image
Part Number
Description
Manufacturer
Datasheet
Request
R


Part Number:
Description:
MICROPHONE OMNI 6X2.2MM W/CAP
Manufacturer:
Panasonic - ECG
Datasheet:

Part Number:
Description:
CAP .0018UF 16V PPS FILM 0603 5%
Manufacturer:
Panasonic - ECG

Part Number:
Description:
CAP .01UF 100V PEN FILM 1210 5%
Manufacturer:
Panasonic - ECG
Datasheet:

Part Number:
Description:
CAP .1F 5.5V GOLD SD VERTICAL
Manufacturer:
Panasonic - ECG
Datasheet:

Part Number:
Description:
SUR ABSORBER 14MM 39V 1000A ZNR
Manufacturer:
Panasonic - ECG
Datasheet:

Part Number:
Description:
FILTER LINE 23.3MH 2A
Manufacturer:
Panasonic - ECG
Datasheet:

Part Number:
Description:
BEAD CORE 600 OHM 100MA 0603 SMD
Manufacturer:
Panasonic - ECG
Datasheet:

Part Number:
Description:
SAW FILTER PCS 1960 MHZ 50/150
Manufacturer:
Panasonic - ECG
Datasheet:
Part Number:
Description:
SAW FILTER WCDMA 1950 MHZ 50/50
Manufacturer:
Panasonic - ECG
Datasheet:
Part Number:
Description:
SAW FILTER EGSM 942 MHZ 50/150
Manufacturer:
Panasonic - ECG
Datasheet:
Part Number:
Description:
SAW FILTER DCS 1842 MHZ 50/150
Manufacturer:
Panasonic - ECG
Datasheet:
Part Number:
Description:
POT 1.0M OHM 3MM SEALED SMD 3 TT
Manufacturer:
Panasonic - ECG
Datasheet:

Part Number:
Description:
MODULE POWER DC/DC 48V/28V 600W
Manufacturer:
Panasonic - ECG
Datasheet:
Part Number:
Description:
RES ARRAY 22 OHM 5% 4 RES SMD
Manufacturer:
Panasonic - ECG
Datasheet: