LF13WBP-11S HRS (HIROSE), LF13WBP-11S Datasheet - Page 8
LF13WBP-11S
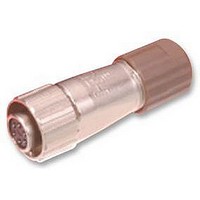
Manufacturer Part Number
LF13WBP-11S
Description
PLUG, FEMALE PIN, 11WAY
Manufacturer
HRS (HIROSE)
Datasheet
1.LF13WBJ-11P.pdf
(11 pages)
Specifications of LF13WBP-11S
Connector Body Material
Zinc Alloy
Gender
Plug
Connector Mounting
Cable Mount
Connector Shell Size
13
Insert Arrangement
13-11
No. Of Contacts
11
Contact
RoHS Compliant
Connector Type
Circular Industrial


The product information in this catalog is for reference only. Please request the Engineering Drawing for the most current and accurate design information.
All non-RoHS products have been discontinued, or will be discontinued soon. Please check the products status on the Hirose website RoHS search at www.hirose-connectors.com, or contact your Hirose sales representative.
8
LF Series●Miniature Waterproof Shielded Connectors
No.
4
Insulator
Heat-shrink tubing
Contact
3
Insulator
2
2
– 1
– 2
Solder
Contact
Table 4. Wire Dimensions
Number of Conductors
Insulator
Cmm
Insulator wall
Illustration
12
11
20
3
6
4
0.5 mm min.
Wire insulation
Table 3
Number of
Conductors
D
Wire
12
20
11
6
Contact
Cable outer jacket
Shielding mesh
(Folded back)
1 to 5,16 to 20
10 to 11
13 to 14
18 to 19
Number of
contacts
D mm
6 to 7
Insulator wall
10 to 12
6 to 15
1 to 6
1 to 9
1 to 4
5 to 7
Wire insulation
C mm
4
4
6
4
6
6
4
Soldering
Note
Note
(1)
(2)
(3)
(1)
(2)
1
2
(1)
(2)
2
3
Place a heat-shrink tubing (inside diameter of
1.1 mm min.) over every other wire.
Perform the soldering of the contact and the
conductor, with the wire’s insulation touching
the contact as shown.
After soldering, slide the heat shrink tubing
over the soldered joint and shrink it. The
tubing should touch the insulator as shown.
Perform the soldering of the contact and the
conductor, with the wire’s insulation touching
the contact as illustrated.
When soldering, to maintain the insulation
between adjacent contacts. Make sure that
the wire’s insulation remains below the edge
of the insulator’s wall 0.5 mm min., as
illustrated.
– 1 6, 12, 20, 11(No.1∼7) Conductors
– 2 3, 4, 11(No.A∼D) Conductors
Soldering conditions
Soldering iron tip temperature: 350±10ç
Soldering time: within 5 sec.
Assure that the solder compound is
sufficiently melted on the soldering iron tip.
When applying, make sure that the solder will
flow correctly at all the contact surfaces
between the conductor and the contact.
After the soldering, keep a distance of D
between the contact end and the cable’s
outer jacket as illustrated.
The distance of D is required in order to
assure correct assembly of the backshell.
Operation
Related parts for LF13WBP-11S
Image
Part Number
Description
Manufacturer
Datasheet
Request
R

Part Number:
Description:
PLUG, MALE PIN, 11WAY
Manufacturer:
HRS (HIROSE)
Datasheet:
Part Number:
Description:
PLUG, MALE PIN, 20WAY
Manufacturer:
HRS (HIROSE)
Datasheet:
Part Number:
Description:
PLUG, FEMALE PIN, 20WAY
Manufacturer:
HRS (HIROSE)
Datasheet:

Part Number:
Description:
Miniature Waterproof Shielded Connectors
Manufacturer:
HIROSE [Hirose Electric]
Datasheet:

Part Number:
Description:
CABLE, U.FL-LP - SMA, 100MM
Manufacturer:
HRS (HIROSE)
Datasheet:
Part Number:
Description:
CABLE, U.FL-LP - SMA, 75MM
Manufacturer:
HRS (HIROSE)
Datasheet:

Part Number:
Description:
CIR CONN PLUG SIZE 7, 6POS, FREE HANGING
Manufacturer:
HRS (HIROSE)
Datasheet:

Part Number:
Description:
CONTACT, SOCKET, 30-26AWG, CRIMP
Manufacturer:
HRS (HIROSE)
Datasheet:
Part Number:
Description:
CONNECTOR, MICRO SD, HINGED
Manufacturer:
HRS (HIROSE)
Datasheet:
Part Number:
Description:
HOUSING, 2MM, 16WAY
Manufacturer:
HRS (HIROSE)
Datasheet:
Part Number:
Description:
HOUSING, 2MM, 18WAY
Manufacturer:
HRS (HIROSE)
Datasheet:
Part Number:
Description:
HOUSING, DF14, 1.25MM, 10WAY
Manufacturer:
HRS (HIROSE)
Datasheet:
Part Number:
Description:
RCPTL, 1MM, W/O SHIELD, R/A, 21WAY
Manufacturer:
HRS (HIROSE)
Datasheet: