32305 Parallax Inc, 32305 Datasheet - Page 11
32305
Manufacturer Part Number
32305
Description
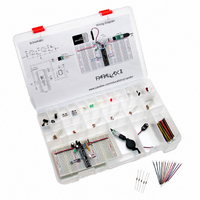
KIT EDUCATION PROPELLER
Manufacturer
Parallax Inc
Series
Propeller™r
Type
MCUr
Specifications of 32305
Contents
Propeller DIP Plus Kit, Prop Plug, PE Kit Project Parts, Breadboards and Storage Box
Product
Microcontroller Accessories
Lead Free Status / RoHS Status
Contains lead / RoHS non-compliant
For Use With/related Products
P8X32A
For Use With
130-32000 - KIT PROPELLER EDU PROJECT PARTS130-32305 - KIT PROPELLER DIP PLUS122-32000 - MANUAL PROPELLER
Lead Free Status / RoHS Status
Lead free / RoHS Compliant, Contains lead / RoHS non-compliant


An Empty Program for the Next Circuit
Whenever you change a prototype circuit, it’s a good idea to load a program that doesn’t do anything
to the I/O pins into the propeller. This reduces the risk of the Propeller chip inadvertently sending a
high signal to a circuit that is sending a low signal, or visa versa. In either case, if no resistor is in
series, it could result in a damaged Propeller chip, or a damaged circuit, or both. Loading an “empty”
program now in anticipation of building new circuits in the future will help protect your Propeller
chip. Ending your experiments this way is a good habit.
'' File: DoNothing.spin
PUB main
Troubleshooting
Here are a list of symptoms and possible causes.
(1) If there is no apparent communication when you plug the Propeller Plug into the PC’s USB port,
(2) If the PE Platform’s power LED did not light when the battery was connected:
(3) If the voltage across the power rails is not 3.3 V, the most common culprits are faulty wiring and
(4) If the Power LED does not light when you plug the battery in after socketing the Propeller chip,
(5) If the Power LED does not glow faintly when you connect the Propeller Plug to the 4-pin header,
(6) Common causes of the “No Propeller Chip found…” message are:
follow the USB link on the Parallax home page. It will take you to the Installing USB Drivers
Page. If the steps on that page don’t fix the problem, follow the Troubleshooting link at the
bottom of that web page.
a faulty meter. If your meter is a lesser-quality model or has been subject to heavy use by other
students, check it against a known voltage before trusting its measurements. Assuming the
voltmeter’s measurements are correct, check wiring, part placement, and part orientation.
check for wiring errors to its pins. If a wire terminates at a row that is shared with a Propeller
chip I/O pin, it’s a prime suspect.
double-check the wiring of the header. The header should be placed in (A, 1) through (A, 4). The
TX pin of the Propeller Plug, (A, 2) must be connected to P31 of the Propeller chip, which is
accomplished with the jumper wire connecting (C, 2) and (C, 11).
Enter and run this program:
a. The LED may be plugged in backwards. Check to make sure the cathode is connected to
b. The battery leads may be plugged into the breadboard backwards. The battery’s +
c. There could be a wiring mistake causing a short circuit from one of the supply voltages to
a. Battery disconnected. Connect the battery.
b. Propeller Plug plugged in upside down. The parts side of the Propeller plug should be
c. Propeller Plug not plugged in to USB port.
Copyright © Parallax Inc. ● Application Note Title and Version ● 11/2/2006 ● Page 11 of 12
the resistor and the anode is connected to the 3.3 V supply rail. In other words, the pin
coming out by the flat spot at the base of the LED’s round plastic housing should be
plugged into (L, 10), and the other pin should be connected to (RED, 10).
terminal should connect to (L, 1) and the – terminal should connect to (L, 2).
ground. If you don’t have a multimeter, start visually checking your wiring again. With
a multimeter, you can check the resistance between the battery’s negative terminal, and
the 3 V power rail. Repeat for 5 V regulated output (G, 3) and for the battery inputs (G,
1). If any of these shows less than 1 Ω, that supply voltage has been shorted to ground.
facing up, and the logo side with the socket labels should be facing the breadboard.
' Empty main method
Related parts for 32305
Image
Part Number
Description
Manufacturer
Datasheet
Request
R


Part Number:
Description:
Microcontroller Modules & Accessories DISCONTINUED BY PARALLAX
Manufacturer:
Parallax Inc

Part Number:
Description:
BOOK UNDERSTANDING SIGNALS
Manufacturer:
Parallax Inc
Datasheet:


Part Number:
Description:
COMPETITION RING FOR SUMOBOT
Manufacturer:
Parallax Inc
Datasheet:


Part Number:
Description:
TEXT INFRARED REMOTE FOR BOE-BOT
Manufacturer:
Parallax Inc
Datasheet:
Part Number:
Description:
BOARD EXPERIMENT+LCD NX-1000
Manufacturer:
Parallax Inc
Datasheet:

Part Number:
Description:
CONTROLLER 16SERVO MOTOR CONTROL
Manufacturer:
Parallax Inc
Datasheet:

Part Number:
Description:
BASIC STAMP LOGIC ANALYZER
Manufacturer:
Parallax Inc
Datasheet:

Part Number:
Description:
IC MCU 2K FLASH 50MHZ SO-18
Manufacturer:
Parallax Inc
Datasheet: