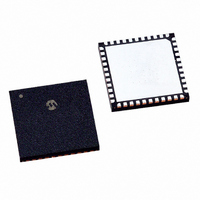
PIC18F45K20-I/ML Microchip Technology, PIC18F45K20-I/ML Datasheet - Page 52

PIC18F45K20-I/ML
Manufacturer Part Number
PIC18F45K20-I/ML
Description
IC PIC MCU FLASH 16KX16 44QFN
Manufacturer
Microchip Technology
Series
PIC® XLP™ 18Fr
Datasheets
1.PIC18F25K20T-ISS.pdf
(42 pages)
2.PIC18F25K20T-ISS.pdf
(12 pages)
3.PIC18F25K20T-ISS.pdf
(14 pages)
4.PIC18F25K20T-ISS.pdf
(456 pages)
5.PIC18F45K20-IPT.pdf
(78 pages)
6.PIC18F26K20-ISO.pdf
(430 pages)
Specifications of PIC18F45K20-I/ML
Program Memory Type
FLASH
Program Memory Size
32KB (16K x 16)
Package / Case
44-QFN
Core Processor
PIC
Core Size
8-Bit
Speed
64MHz
Connectivity
I²C, SPI, UART/USART
Peripherals
Brown-out Detect/Reset, HLVD, POR, PWM, WDT
Number Of I /o
35
Eeprom Size
256 x 8
Ram Size
1.5K x 8
Voltage - Supply (vcc/vdd)
1.8 V ~ 3.6 V
Data Converters
A/D 14x10b
Oscillator Type
Internal
Operating Temperature
-40°C ~ 85°C
Processor Series
PIC18F
Core
PIC
Data Bus Width
8 bit
Data Ram Size
1.5 KB
Interface Type
CCP/ECCP/EUSART/I2C/MSSP/SPI
Maximum Clock Frequency
64 MHz
Number Of Programmable I/os
36
Number Of Timers
4
Maximum Operating Temperature
+ 85 C
Mounting Style
SMD/SMT
3rd Party Development Tools
52715-96, 52716-328, 52717-734, 52712-325, EWPIC18
Development Tools By Supplier
PG164130, DV164035, DV244005, DV164005, PG164120, DV164136
Minimum Operating Temperature
- 40 C
On-chip Adc
14-ch x 10-bit
Package
44QFN EP
Device Core
PIC
Family Name
PIC18
Maximum Speed
64 MHz
Operating Supply Voltage
2.5|3.3 V
Lead Free Status / RoHS Status
Lead free / RoHS Compliant
For Use With
DM240313 - BOARD DEMO 8BIT XLPAC164112 - VOLTAGE LIMITER MPLAB ICD2 VPPDM164124 - KIT STARTER FOR PIC18F4XK20AC164322 - MODULE SOCKET MPLAB PM3 28/44QFN
Lead Free Status / Rohs Status
Lead free / RoHS Compliant
PICkit™ 3 Debug Express
DS41370C-page 48
#5: To begin an ADC conversion, set bit 1 of ADCON0, the GO/DONE bit. When the
conversion is done the hardware will clear that bit, so the GO/DONE may then be polled
to wait for the conversion to complete. Once the conversion is complete and GO/DONE
= 0, the ADC conversion result may be read from ADRESH and ADRESL.
3.7.3
Open the lesson source files 07 ADC.c and 07 ADC.h in an MPLAB editor window if
they are not already open.
Of note is that the Timer0 setup code has been moved into a function and replaced with
a function call. Two new functions were added to support the ADC.
The function prototypes have also been added to the header file, 07 ADC.h.
In main() before getting to the while(1) loop, the program makes two function calls
to set up the Timer0 and ADC peripherals using Timer0_Init() and ADC_Init(),
respectively.
To change the LED rotation speed based on the potentiometer, the ADC conversion
value is used to set Timer0 just after it overflows. The higher the value written to Timer0,
the less time it takes to overflow again, as the timer counts up from the written value.
This is accomplished with two new statements at the bottom of the while(1) loop:
The TMR0H buffer is written with the 8 Most Significant bits of the ADC conversion, and
then is written with Timer0 with a ‘0’ in the low byte on the TMR0L assignment
statement. Recall from Lesson 5 that since TMR0H is actually a buffer and not the
upper byte of the timer, and is written to the timer when TMR0L is written. Thus, it must
be written first as it is here.
We can calculate the amount of delay for a given ADC value, knowing that
Timer0_Init() sets the TMR0 prescaler to 1:4, and our oscillator is 1MHz. Timer0
will count at 4 * the instruction rate, or 4 * 1/(F
= 16 us. The number of counts until overflow occurs is 0x10000 – (start count) where
(start count) is the value written to TMR0 – The ADC result in the upper byte and 0x00
in the lower. The total delay is then the number of counts times the count rate. For an
ADC result of 0x81, the delay is (0x10000 – 0x8100) * 16 us = 0x7F00 * 16 us = 32512
* 16 us = 0.52 seconds.
3.7.4
Build and program the Lesson 7 project, then Run the application in the debugger.
Turning the demo board potentiometer will affect the rotation speed of the LEDs. The
switch may be pressed to reverse the rotation.
Halt the Lesson 7 program. Note that several SFRs and variables have already been
added to a Watch window. Use Breakpoints and Step commands to explore the code.
Observe how the ADC result in ADRESH is affected by the potentiometer voltage, and
how this result is copied into TMR0.
void Timer0_Init(void)
void ADC_Init(void) unsigned char
ADC_Convert(void)
Exploring the Lesson 7 Source Code
Build and Run the Lesson 7 Code with PICkit 3 Debug Express
TMR0H
TMR0L
= ADC_Convert();
= 0;
OSC
//
//
/4) = 4 * 1/(1MHz/4) = 4 * 1/250kHz
MSB from ADC
LSB = 0
© 2009 Microchip Technology Inc.


