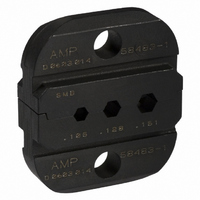
58483-1 Tyco Electronics, 58483-1 Datasheet - Page 2

58483-1
Manufacturer Part Number
58483-1
Description
Crimp Tool Die
Manufacturer
Tyco Electronics
Series
PRO-CRIMPER IIr
Datasheet
1.58483-1.pdf
(3 pages)
Specifications of 58483-1
Features
Hex / Military
Crimp Application
Coaxial
Connector Type
SMB
Crimp Handle
A9996-ND
Crimp Or Cable Size
RG/U-161, 174, 179, 187, 188, 316
Rf Series
SMB
Product
Tools & Accessories
Polarity
Normal
Impedance
50 Ohms
Termination Style
Crimp
Accessory
Hex Die Assembly
Body Style
Straight
Cable Type
RG 161, 174, 179, 187, 188, 188 Double Braid, RD 316
Contact Type
Crimp
Mounting Angle
Straight
For Use With
50 Ohm SMB RF/Coaxial Connectors
Lead Free Status / RoHS Status
na
Lead Free Status / RoHS Status
na, Not applicable / Not applicable
Other names
A9968
2. DESCRIPTION
The tool frame features a stationary jaw and handle, a
moving jaw, a moving handle, and an adjustable
ratchet that ensures full crimping. The tool frame
holds the die assembly.
The die assembly consists of an indenter (stationary
die) and an anvil (moving die). When closed, the dies
form three crimping chambers. Each die is held in the
hand tool frame by a single screw.
3. INSTALLATION AND REMOVAL OF
2
PRO-CRIMPER III Hand Tool Assembly 58499-1 with Die Assembly 58483-1
Anvil
of 3
Indenter
DIE ASSEMBLY
1. Close the tool handles until the ratchet releases,
then allow the handles to open fully.
2. Insert the dies into the tool jaws as shown in
Figure 2, and align the retaining holes in each die
with the associated hole in the tool.
3. Thread, but do not tighten, the die retaining
screws into the holes.
4. Carefully close the tool handles, making sure
that the dies align properly.
5. Tighten the die retaining screws with the
appropriate hex wrench.
6. To disassemble, close the tool handles until the
ratchet releases, remove the two die retaining
screws, and slide the dies out of the tool jaws.
Tool Frame
Jaws
(Figure 1)
(Figure 2)
Figure 2
Die Retaining
Screws
Tyco Electronics Corporation
4. CRIMPING PROCEDURE
Make sure that the center contact is properly crimped
and assembled onto the connector as described in
applicable connector instruction sheet. Then proceed
as follows:
5. RATCHET ADJUSTMENT
The tool ratchet mechanism features an adjustment
wheel with numbered settings. The adjustment wheel
controls the amount of handle pressure exerted on
the jaws during crimping. If the crimp is not
acceptable, adjust the ratchet as follows:
Shoulder of Plug
Body Close to
Edge of Die
1. Slide the ferrule over the cable braid until it is
positioned against the shoulder of the plug body.
2. Close the tool handles until the ratchet releases,
then allow the handles to open FULLY.
3. Place the ferrule in the appropriate crimping
chamber on the anvil die so that the shoulder of
the plug body is close to the edge of the die. Refer
to Figure 3.
NOTE
4. While holding the assembly, close the tool
handles until the dies hold the ferrule in place.
5. Carefully close the tool handles until the ratchet
releases, then allow the handles to open FULLY.
6. Remove the ferrule from the dies.
7. Inspect the crimped ferrule according to
applicable connector instruction sheet. If
necessary, adjust the ratchet as described in
Section 5.
1. Remove the lockscrew from the ratchet
adjustment wheel.
i
Crimping
Chamber
(Ref)
Refer to Figure 1 for the appropriate crimping
chamber.
Figure 3
(Figure 4)
(Ferrule Only)
408-9830
Rev
E


