790163-1 TE Connectivity, 790163-1 Datasheet - Page 2
790163-1
Manufacturer Part Number
790163-1
Description
HAND TOOL ASSEMBLY AND DIE ASSEMBLY
Manufacturer
TE Connectivity
Type
Hand Toolr
Specifications of 790163-1
Rohs Compliant
NA
Lead Free Status / RoHS Status
RoHS Not Applicable


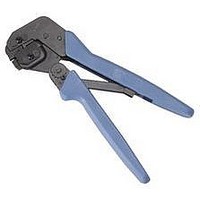
2. DESCRIPTION
The tool frame features a stationary jaw and handle, a
moving jaw and handle, and an adjustable ratchet that
ensures full crimping. The tool frame holds the die
assembly. Refer to Figure 1.
The die assembly consists of an insulation stuffer,
wire stuffer, housing support, housing guides, and
mounting and retaining hardware.
3. INSTALLATION AND REMOVAL OF
2
PRO-CRIMPER III Hand Tool Assembly 1976319-1 with Die Assembly 1976320-1
of 4
DIE ASSEMBLY
1. Close the tool handles until the ratchet releases,
then allow the handles to open fully. If present,
remove both retaining screws from the tool frame.
2. Orient the insulation stuffer as shown in Figure
2, and insert it into the stationary jaw of the tool
frame. Align the holes with the associated holes in
the tool frame. Insert the short retaining pins and
short retaining screw into the holes in the tool
frame. Tighten the screw.
3. Orient the housing support as shown in Figure
2, and insert it into the moving jaw of the tool
frame. Align the holes with the associated holes in
the tool frame. Orient the right housing guide as
shown, and mount it onto the tool frame using the
long retaining pins. Insert the long retaining screw
through the hole in the right housing guide. Tighten
the screw.
4. Refer to Figure 2. Orient the left housing guide
as shown, and secure it onto the tool frame using
the nut. Tighten the nut.
Socket Head Cap Screw
(Retains Wire Stuffer,
Ref)
Insulation
Stuffer
Wire Stuffer (Ref)
Left Housing
Guide
Housing
Support
Nut
Tyco Electronics Corporation
Figure 2
Right Housing
Guide
4. CRIMPING PROCEDURE
Before proceeding, refer to the applicable Application
Specification: 114–22008 (Category 5e EMT) or
114–13035 and 114–93006 (Category 6 shielded),
and ensure the following:
CAUTION
5. Carefully close the tool handles, making sure
that the parts align properly.
6. To disassemble, close the tool handles until the
ratchet releases. Remove the nut, screws, housing
guides, retaining pins, housing support, and
insulation stuffer out of the tool frame jaws.
— the modular plug and cable are compatible
— the cable polarity is properly maintained
— the modular plug is properly crimped and
assembled
1. Close the tool handles until the ratchet releases,
then allow the handles to open FULLY.
2. Hold the tool so that the back is facing you.
Insert the modular plug (including shield and cable)
in the crimping chamber until it bottoms . Refer to
Figure 3.
!
Tool Frame
Make sure that the modular plug shield is fully
bottomed onto the body. With some cables
containing
especially IMPORTANT to check.
Short Retaining
Pin (2 Places)
Short Retaining
Screw
shielded twisted pairs
Long Retaining
Pin (2 Places)
Long Retaining
Screw
, this is
408-8738
Rev
D