DV164101 Microchip Technology, DV164101 Datasheet
DV164101
Specifications of DV164101
DV164101R
Available stocks


Related parts for DV164101

DV164101 Summary of contents
Page 1
... Microchip Technology Inc. ™ PICkit 1 Flash Starter Kit User’s Guide DS40051D ...
Page 2
... PICLAB, PICtail, PowerCal, PowerInfo, PowerMate, PowerTool, rfLAB, rfPICDEM, Select Mode, Smart Serial, SmartTel and Total Endurance are trademarks of Microchip Technology Incorporated in the U.S.A. and other countries. SQTP is a service mark of Microchip Technology Incorporated in the U.S.A. All other trademarks mentioned herein are property of their respective companies. ...
Page 3
... FAQs ............................................................................................................ 23 Appendix A. Hardware Description A.1 Introduction .................................................................................................. 27 A.2 Highlights ..................................................................................................... 27 A.3 In-Circuit Serial Programming™ (ICSP™) ................................................... 27 A.4 Programming Hardware ............................................................................... 27 A.5 USB Communications Protocol .................................................................... 29 A.6 Schematic Diagrams .................................................................................... 31 2004 Microchip Technology Inc. ™ PICKIT 1 FLASH STARTER KIT Table of Contents ® MCUs ........................................................ 6 ® ...
Page 4
... C.5 Lesson 3 – Interrupts ................................................................................... 53 C.6 Lesson 4 – Analog-to-Digital Converters and Comparators ........................ 57 C.7 Lesson 5 – Program Memory Look-up Routines ......................................... 60 C.8 Lesson 6 – Data EE Look-up Routines ........................................................ 63 C.9 Lesson 7 – Frequency Counting with Timer1 Gate ..................................... 66 Worldwide Sales and Service .....................................................................................72 DS40051D-page iv 2004 Microchip Technology Inc. ...
Page 5
... Appendix C: PIC12F675 Programming Projects – This appendix contains introductory lessons for persons new to PICmicro • Worldwide Sales and Service – A listing of Microchip sales and service locations and telephone numbers worldwide. 2004 Microchip Technology Inc. ™ PICKIT 1 FLASH STARTER KIT Preface ™ ...
Page 6
... Referenced books Examples #define START c:\autoexec.bat <label>, <exp> MPASMWIN [main.asm] errorlevel {0|1} " " filename list " [ list_option..., " " list_option ] 0xFFFF, 0x007A char isascii (char, ch); File > Save OK, Cancel <Tab>, <Ctrl-C> MPLAB IDE User’s Guide 2004 Microchip Technology Inc. ...
Page 7
... Job postings • Microchip consultant program member listing • Links to other useful web sites related to Microchip products • Conferences for products, development systems, technical information and more • Listing of seminars and events 2004 Microchip Technology Inc. ® Manuals Preface DS40051D-page 3 ...
Page 8
... Plus, this line provides information on how customers can receive the most current upgrade kits. The Information Line Numbers are: 1-800-755-2345 for U.S. and most of Canada. 1-480-792-7302 for the rest of the world. DS40051D-page 4 ® II device programmer and PICSTART ® Plus development 2004 Microchip Technology Inc. ...
Page 9
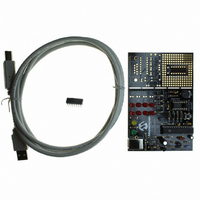
... Press the Push Button Switch, labeled SW1, on the board and the sequence of the lights will change. Rotate the Variable Resistor, labeled RP1, and the light sequence will blink at a different rate. FIGURE 1-1: USB Cable 2004 Microchip Technology Inc. ™ PICKIT 1 FLASH STARTER KIT ™ ...
Page 10
... PICkit 1 Flash Starter Kit CDROM.) DS40051D-page 6 ® MCUs ® microcontroller units (MCU). The programming projects in 2004 Microchip Technology Inc. ® ...
Page 11
... FIGURE 2-1: Notice that the Device Power check box is selected. This is a default function indicating the device power is turned on. Note: To turn the device power off, deselect the check box. 2004 Microchip Technology Inc. ™ PICKIT 1 FLASH STARTER KIT ™ 1 Classic Software PICkit 1 CLASSIC PROGRAMMING INTERFACE USER’ ...
Page 12
... In the normal mode of operation, the hex file is updated with every build in MPLAB IDE. This ensures that the latest version built by MPLAB IDE will be written to the device. DS40051D-page 8 IMPORT HEX FILE WRITE SUCCESSFUL STATUS BAR WRITE ERROR STATUS BAR 2004 Microchip Technology Inc. ...
Page 13
... To view the code written to the device, click Read Device. The code is displayed in the Program and EEDATA Memory windows for your review. If all zeros are displayed in the Program Memory window possible that the device is code protected. 2004 Microchip Technology Inc. VERIFY PROGRAM CODE STATUS BAR CODE ERROR STATUS BAR ...
Page 14
... Once the full erase is complete, regenerate the OSCCAL and reset the bandgap calibration value bits. Note: The regenerated OSCCAL function runs a program on the device to recalculate the oscillator calibration value. See Lesson 7 in Appendix C. “PIC12F675 Programming Projects” for more details. DS40051D-page 10 CODE PROTECT DEVICE ERASE 2004 Microchip Technology Inc. ...
Page 15
... The Write Bandgap Calibration Value window will appear as shown in Figure 2-11. Select a bit value from the list and click OK. FIGURE 2-11: The bandgap bit value will appear in the Device Configuration box, as shown in Figure 2-12. 2004 Microchip Technology Inc. REGENERATE OSCCAL REGENERATE BANDGAP CALIBRATION VALUE SELECT BANDGAP BIT VALUE DS40051D-page 11 ...
Page 16
... The 2.5 kHz OSC is a square wave signal that, when selected, is input to pin 3 of the evaluation socket. See the schematic Figure A-1 in Appendix A. This function is used by Lesson 7 in Appendix C. “PIC12F675 Programming Projects”, and for OSCCAL regeneration. FIGURE 2-13: DS40051D-page 12 DEVICE CONFIGURATION BOARD CONTROLS 2004 Microchip Technology Inc. ...
Page 17
... FIGURE 3-1: Notice that the Device Power check box is selected. This is a default function indicating the device power is turned on. Note: To turn the device power off, deselect the check box. 2004 Microchip Technology Inc. ™ PICKIT 1 FLASH STARTER KIT ™ 1 Baseline Flash Software PICkit 1 BASELINE FLASH PROGRAMMING INTERFACE USER’ ...
Page 18
... The status of the program write is displayed in the status bar located at the bottom of the Interface window. If the write is successful, the status bar turns green and displays “Write Successful”, as shown in Figure 3-4. DS40051D-page 14 SELECT DEVICE IMPORT HEX FILE 2004 Microchip Technology Inc. ...
Page 19
... Figure 3-6. FIGURE 3- discrepancy is found, the status bar turns red and displays the error “Verify Failed Error in program memory”, as shown in Figure 3-7. 2004 Microchip Technology Inc. WRITE SUCCESSFUL STATUS BAR WRITE ERROR STATUS BAR VERIFY PROGRAM CODE STATUS BAR ...
Page 20
... Write Device function performs an erase prior to writing code to the device. To erase the device using the Erase function, click the Erase button, or select Programmer > Erase from the toolbar menu, as shown in Figure 3-9. FIGURE 3-9: DS40051D-page 16 VERIFY PROGRAM CODE ERROR STATUS BAR CODE PROTECT DEVICE ERASE 2004 Microchip Technology Inc. ...
Page 21
... OSC 3.2.8 The 2.5 kHz OSC is a square wave signal that, when selected, is input to pin 3 of the evaluation socket. See the schematic Figure A-1 in the Appendix A. FIGURE 3-10: 2004 Microchip Technology Inc. BOARD CONTROLS DS40051D-page 17 ...
Page 22
... PICkit 1 Flash Starter Kit User’s Guide NOTES: DS40051D-page 18 2004 Microchip Technology Inc. ...
Page 23
... Detail information on MPLAB IDE can be found in the “ MPLAB Guide”, (DS51025) available on the MPLAB IDE CD-ROM included in the kit or from the Microchip Technology Inc. website (http://www.microchip.com). MPLAB IDE is the integrated development environment supplied by Microchip Technology Inc. for developing software for PIC to: • ...
Page 24
... A window will appear and show the progress. If there are no errors, the program can be simulated or programmed into the PICkit 1 Flash Starter Kit software. (See Section 4.4.5 “Programming the Device from MPLAB IDE”. DS40051D-page 20 CREATING A PROJECT OPENING A PROJECT 2004 Microchip Technology Inc. ...
Page 25
... Figure 4-5. FIGURE 4-5: These buttons allow the user to: 1. Run code: 2. Pause code: 3. Single Step code, step into functions: 4. Single Step code, step over functions: 5. Reset code: 2004 Microchip Technology Inc. COMPILE PROJECT MPLAB SIMULATION SIMULATION TOOLBAR DS40051D-page 21 ...
Page 26
... PICkit 1 is plugged into the computer via the USB port. The Output window will also report any errors encountered in the selection or programming of the device. FIGURE 4-8: DS40051D-page 22 CODE WINDOW VIEW MENU OPTIONS SELECTING PICkit 1 AS PROGRAMMER 2004 Microchip Technology Inc. ...
Page 27
... Are the code protect bits set in the source code file? Currently, the device can only be code protected by selecting the Tools > Code Protect Device option in the PICkit 1 user’s interface. 2. The part may be damaged. Try another device. 2004 Microchip Technology Inc. ™ PICKIT 1 FLASH STARTER KIT USER’ ...
Page 28
... Check to see if the SW1 switch is pressed. Current Limit Exceeded 5.2.4 Question: Receiving error message “USB Hub Current Limit Exceeded” from Microsoft Windows 2000. Answer: Check for shorts on the circuit board. FIGURE 5-1: DS40051D-page 24 USB HUB CURRENT LIMIT EXCEEDED 2004 Microchip Technology Inc. ...
Page 29
... Question: When the Verify or Read Device buttons are pushed, the Program Memory window comes up with all zeros. What is wrong? Answer: The device may be code protected. Ensure code protection has not been selected in the configuration word. 2004 Microchip Technology Inc. DS40051D-page 25 ...
Page 30
... PICkit 1 Flash Starter Kit User’s Guide NOTES: DS40051D-page 26 2004 Microchip Technology Inc. ...
Page 31
... The programming I/O signals are generated by software routines on I/O port pins RC6 and RC7 of the PIC16C745, which drive I/O port pins RA0/GP0 (ICSPDAT) and RA1/GP1 (ICSPCLK) of the target 8 or 14-pin Flash device. 2004 Microchip Technology Inc. ™ PICKIT 1 FLASH STARTER KIT pin ...
Page 32
... PICkit 1 Flash Starter Kit User’s Guide FIGURE A-1: DS40051D-page 28 PROGRAMMING HARDWARE 2004 Microchip Technology Inc. ...
Page 33
... Return version information. The following bytes are returned: <Major><Minor><Dot>. • ‘W’ <word> – Write Program Memory. Loads the write latch, sends the write command and increments to the next address. 2004 Microchip Technology Inc. and V PP and V ...
Page 34
... CDROM in the unsupported directory. DS40051D-page 30 ‘4’ (Write by Word) Low-order byte, Word 0 High-Order 6 Bits Word 3 Bits 13 Word 0 Low-order byte, Word 1 High-Order 6 Bits Word 3 Bits 11 Word 1 Low-order byte, Word 2 Word 3 High-Order 6 Bits Bits Word 2 Low-order byte, Word 3 2004 Microchip Technology Inc. ...
Page 35
... A.6 SCHEMATIC DIAGRAMS FIGURE A-1: PICkit™ 1 BOARD DIAGRAM 2004 Microchip Technology Inc. DS40051D-page 31 ...
Page 36
... PICkit 1 Flash Starter Kit User’s Guide FIGURE A-2: LED LAYOUT DS40051D-page 32 2004 Microchip Technology Inc. ...
Page 37
... FIGURE A-3: V SUPPLY PP 2004 Microchip Technology Inc. DS40051D-page 33 ...
Page 38
... PICkit 1 Flash Starter Kit User’s Guide FIGURE A-4: USB CONTROL DS40051D-page 34 2004 Microchip Technology Inc. ...
Page 39
... FIGURE A-5: PROTOTYPE 1 2004 Microchip Technology Inc. DS40051D-page 35 ...
Page 40
... PICkit 1 Flash Starter Kit User’s Guide FIGURE A-6: PROTOTYPE 2 DS40051D-page 36 2004 Microchip Technology Inc. ...
Page 41
... Appendix B. Baseline Flash Microcontroller Programming Schematic B.1 SCHEMATIC DIAGRAM FIGURE B-1: 2004 Microchip Technology Inc. ™ PICKIT 1 FLASH STARTER KIT BASELINE FLASH MICROCONTROLLER PROGRAMMER SCHEMATIC USER’S GUIDE DS40051D-page 37 ...
Page 42
... PICkit 1 FLASH Starter Kit User’s Guide NOTES: DS40051D-page 38 2004 Microchip Technology Inc. ...
Page 43
... The consequences of uncorrected switch bounce can range from being just annoying to catastrophic. For example, imagine advancing the TV channel, but instead of getting the next channel, the selection skips one or two. This is a situation a designer should strive to avoid. 2004 Microchip Technology Inc. ™ PICKIT 1 FLASH STARTER KIT USER’ ...
Page 44
... Why suffer the additional expense when software is free and program memory is abundant. FIGURE C-1: FIGURE C-2: DS40051D-page 40 FILTERING DEBOUNCE SOLUTION + SHIFT REGISTER DEBOUNCE SOLUTION + CLK SW CLR Debounce Clock Filtered Switch Output Filtered Switch Output 2004 Microchip Technology Inc. ...
Page 45
... Brute Force debounce method. Notice that the debounce loop is looking for a stable released state for 10 milliseconds before returning to the top of the main loop. Any instability, including a stable button pushed state, resets the debounce 10 millisecond timer. 2004 Microchip Technology Inc. DS40051D-page 41 ...
Page 46
... PICkit 1 Flash Starter Kit User’s Guide FIGURE C-3: DS40051D-page 42 BRUTE FORCE SWITCH DEBOUNCE Debounce Initialize No Switch Closed? Yes Toggle LED Set Timer Count For 10 ms Yes Switch Closed? No Decrement Timer Counter Yes Timeout? No 2004 Microchip Technology Inc. ...
Page 47
... It is unlikely that the counter will change saturation state unless the count is too short, or the switch is headed in that direction. Figure C-4 outlines the software actions necessary to implement the Switch Filtering Debounce method. 2004 Microchip Technology Inc. DS40051D-page 43 ...
Page 48
... TIME AVERAGED SWITCH FILTER DEBOUNCE Switch Filter No Timer0 Overflow? Yes Closed Switch State? FilterCount< MaxCount? Yes Increment FilterCount FilterCount>= MaxCount? Yes Turn LED1 On Turn LED0 Off Open No FilterCount> MinCount? Yes Decrement FilterCount No FilterCount<= MinCount? Yes Turn LED0 On Turn LED1 Off 2004 Microchip Technology Inc. ...
Page 49
... Holding the button down for more than 1 second, while in the Brute Force mode, causes the demo to change to the Switch Filter method. LED D1 will light as an indication of the change. Repeat steps 1 through 5 above and load the DbncFltr.hex file to run this demo. 2004 Microchip Technology Inc. DS40051D-page 45 ...
Page 50
... Compared to Figure C-6, which shows a block diagram of state machine based code clear that using a state machine cuts down on code space and the likelihood of missing a repetitive task call. DS40051D-page 46 2004 Microchip Technology Inc. ...
Page 51
... FIGURE C-5: Initialize Routine Clear WDT No ButtonPress()? Clear WDT No ButtonPress()? Clear WDT No ButtonPress()? Clear WDT No ButtonPress()? 2004 Microchip Technology Inc. STATE MACHINE NOT USED Clear WDT Yes Turn only No ButtonPress() LED0 on Clear WDT Yes Turn only No ButtonPress()? LED1 on Clear WDT ...
Page 52
... Initialize Routine Clear WDT No ButtonPress()? Yes Increment State Variable State Variable = Turn only Turn only LED2 on LED4 on Turn only Turn only Turn only LED3 on LED5 on LED1 on C.4.2 “Implementation” ( Turn only LED6 on Turn only LED7 for details 2004 Microchip Technology Inc. ...
Page 53
... As mentioned before generally a good idea to visually construct the state machine in the form of a flowchart. Finally, create a software module for each of the states and tie them together according to the flowchart just created. 2004 Microchip Technology Inc. DS40051D-page 49 ...
Page 54
... The following example code shows how to use a computed goto for a state machine. DS40051D-page 50 SWITCH STATEMENT // turn LED0 on break; // turn LED1 on break; // turn LED2 on break; STATE = State0 // if for some reason a undefined state occurs, // re-initialize the state machine 2004 Microchip Technology Inc. ...
Page 55
... StateTable goto goto goto goto State0 . . . incf return State1 . . . return 2004 Microchip Technology Inc. COMPUTED GOTO STATE ;initialize state machine StateMachine Main high StateTable ;set high order byte of program PCLATH ; counter appropriately STATE, W ;mask state variable to keep 03h ...
Page 56
... The D1 LED will light up, then the D2 and so on. C.4.3.3 FILES REQUIRED FOR PROGRAM MODIFICATION Assembly • state.asm HI-TECH C • state.c • state.h DS40051D-page 52 ® microcontroller using the 2004 Microchip Technology Inc. ...
Page 57
... Code”, for more information on the required files needed to build this project in MPLAB IDE. Also, see the source code files for additional comments on the implementation. For a high-level flowchart, see Figure C-10. 2004 Microchip Technology Inc. LED MULTIPLEXING TRUTH TABLE D1 D2 ...
Page 58
... Library file that contains the Display and Debounce routines for the PIC12F675 or PIC12F629 respectively • 12f629.lkr or 12f675.lkr – Linker Script for PIC12F629 and PIC12F675 respectively (Linker Script located in C:\Program Files\MPLAB IDE\MCHIP_TOOLS) FIGURE C-7: DS40051D-page 54 MPLAB PROJECT SETUP – ASSEMBLY 2004 Microchip Technology Inc. ...
Page 59
... Contains core Display and Debounce routines (When assembled, a intlib.o file will be created) C Source Code • intlib.c – Contains core Display and Debounce routines (When compiled, a intlib.obj file will be created) • intlib.h – Header file 2004 Microchip Technology Inc. MPLAB PROJECT SETUP – C DS40051D-page 55 ...
Page 60
... MPLAB PROJECT SETUP – LIBRARY MODIFICATIONS HIGH LEVEL FLOWCHART START Main() Initialize PIC12F6XX Load END Yes Main() Is Button No Pushed? Yes Change Flashing START Isr() Timer0 Update Yes Overflow LED Array Interrupt? No GP3-Pin Change Interrupt? No END Isr() 2004 Microchip Technology Inc. ...
Page 61
... Bits CMIE and PEIE must be set to enable the comparator interrupt which can be used to wake the device from SLEEP. Figure C-11 shows the project setup for the assembly and C projects. FIGURE C-11: 2004 Microchip Technology Inc setting CIS = 1, thus making the analog IN +. The module compares the potentiometer voltage with the ...
Page 62
... A/D module. In this case, the potentiome- ter's output serves as the input to AN0. Figure C-12 shows the source code files for the assembly and C projects respectively. FIGURE C-12: DS40051D-page 58 when the LEDs are updated. DD ASSEMBLY AND C SOURCE CODE FILES 2004 Microchip Technology Inc. ...
Page 63
... FIGURE C-13: 2004 Microchip Technology Inc. ANALOG-TO-DIGITAL CONVERSION START lsr() Timer0 Yes Overflow Interrupt A/D Service Flag Set? No Update LEDs Toggle A/D Service Flag END lsr() Yes Read A/D Register DS40051D-page 59 ...
Page 64
... Figure C-14 shows the flowchart for this example. DS40051D-page 60 voltage levels or PIC microcontroller reset. DD LOOK-UP TABLE WRITTEN IN ASSEMBLY high StartTable PCLATH low StartTable index, w STATUS, C PCLATH, f PCL " " M " " i "c" "r" "o" "c" "h" "i" "p" 2004 Microchip Technology Inc. ...
Page 65
... The lookup routines presented herein are useful in applications that require the following: 1. Retrieving calibration values. 2. Retrieving serial numbers. 3. Retrieving LED sequences. 4. Retrieving constants or strings in general that will not change over the lifetime of the PIC microcontroller. 2004 Microchip Technology Inc. PROGRAM MEMORY LOOK-UP TABLE PROCESS START Main() Initialize Load END ...
Page 66
... LEDs. To increment to the next look-up value, press SW1. See Table C-2. TABLE C-2: DS40051D-page 62 DATA TABLE Instruction retlw retlw retlw retlw retlw retlw retlw retlw Byte 0x5F 0x06 0x3B 0x2F 0x66 0x6D 0x7D 0x07 2004 Microchip Technology Inc. ...
Page 67
... LED the same time. When SW1 is pressed, an interrupt-on-change is generated and the next LED sequence is read from the data memory. Figure C-15 shows the flowchart for this lesson. 2004 Microchip Technology Inc. INDEX VARIABLE index,w ; move data memory address pointer EEADR ...
Page 68
... In general, for any applications that require non-volatile variable memory. DS40051D-page 64 DATA EE LOOK-UP ROUTINES Main() Overflow Interrupt? Load END GP3-Pin Yes Main() Change Interrupt Button Pushed? Yes Retrieve Data from data memory update LEDs START Isr() Timer0 Yes Update LED Array No No END Isr() 2004 Microchip Technology Inc. ...
Page 69
... Program the dtlookup.HEX file into the PIC microcontroller. 2. After the hex file is programmed into the device, the LED array should show the first look-up value in the 8 LEDs. To increment to the next look-up value, press SW1. See Table C-3. TABLE C-3: 2004 Microchip Technology Inc. DATA TABLE Instruction org DE ...
Page 70
... This program could be useful in the following applications: 1. High volume production environment. 2. Battery applications could use on-board calibration to recalibrate the internal RC oscillator as the battery voltage drops. 3. Applications that are exposed to varying voltage and temperature ranges could have intelligent on-board recalibration. DS40051D-page 66 2004 Microchip Technology Inc. ...
Page 71
... View the test signal output on GP0 using the oscilloscope, or frequency counter, and compare the measurements to the previous one before performing a calibration. The measurement will be within kHz. FIGURE C-16: 2004 Microchip Technology Inc. PICkit 1 FLASH STARTER KIT PROGRAMMING INTERFACE DS40051D-page 67 ...
Page 72
... This is the main file which contains the main program, interrupt routine and functions • autocal.h – Header File • delay.obj – Hi-Tech PICC Lite™ supplied delay function (Source code is located in C:\Picclite\samples\delay) FIGURE C-18: DS40051D-page 68 MPLAB PROJECT SETUP – ASSEMBLY MPLAB PROJECT SETUP – C 2004 Microchip Technology Inc. ...
Page 73
... FIGURE C-19: FIGURE C-20: 2004 Microchip Technology Inc. MAIN FLOW START MAIN() Retrieve Factory Calibration Value Is Calibrate Yes Button Pressed? No CALL TEST() TEST FLOW START TEST() Has a Update OSCCAL Yes Calibration Been Performed? Calibration Value No Output 5 kHz 50% Square Wave Is Calibration ...
Page 74
... DS40051D-page 70 CALIBRATE FLOW START CALIBRATE() Reset Calibration Counter Measure 200 s PW Check If The Measured PW Is Within The Specified Tolerance (See Figure C-22) Decrement No Calibration Counter Is Calibration Counter = 0? Yes Update EEPROM Flag and Calibration Value END CALIBRATE() 2004 Microchip Technology Inc. ...
Page 75
... FIGURE C-22: Yes Yes PW = Pulse Width 2004 Microchip Technology Inc. CHECKPW(W) FLOW START CHECKPW(W) Is The Measured PW = 200 s? No Yes Is The Measured PW < 200 The Measured PW Within The Tolerance? No Adjust OSCCAL Down END CHECKPW(W) Yes Is The Measured PW Within The Tolerance? No Adjust OSCCAL Up ...
Page 76
... Via Quasimodo, 12 20025 Legnano (MI) Milan, Italy Tel: 39-0331-742611 Fax: 39-0331-466781 Netherlands Waegenburghtplein 4 NL-5152 JR, Drunen, Netherlands Tel: 31-416-690399 Fax: 31-416-690340 United Kingdom 505 Eskdale Road Winnersh Triangle Wokingham Berkshire, England RG41 5TU Tel: 44-118-921-5869 Fax: 44-118-921-5820 05/28/04 2004 Microchip Technology Inc. ...