CTE701 3M, CTE701 Datasheet - Page 3
CTE701
Manufacturer Part Number
CTE701
Description
WORKSTATION MONITOR CHECKER
Manufacturer
3M
Series
ScanEM® Probesr
Type
Monitorr
Datasheet
1.CTE701.pdf
(4 pages)
Specifications of CTE701
Description/function
Workstation Monitor Checkers
For Use With/related Products
Workstation, Wrist Straps
Lead Free Status / RoHS Status
Contains lead / RoHS non-compliant
Features
-
Power Supply Type
-
Lead Free Status / Rohs Status
Lead free / RoHS Compliant
Other names
51111161982
80000919490
SCP265
XA004143203
80000919490
SCP265
XA004143203


6
Ground Resistance
Ground Resistance
Monitor Alarm Threshold
Monitor Alarm Threshold
Dissipative (Soft) Grounds
This test verifies proper operation of soft (dissipative) ground monitoring such as
of mats, dissipative plastics, etc.
Setup
Ground Resistance
Ground Resistance
Ground Resistance
Setup switches allow you to set the parameters in accordance with your
specification.
Monitor Alarm Threshold
Monitor Alarm Threshold
Monitor Alarm Threshold
All other switch positions are unused for this purpose.
Pressing “Soft Ground” push-button switch will result in load with slightly lower
resistance than the alarm threshold.
Procedure
When measuring dissipative grounds, allow some time -- up to 30 seconds --
for the monitor to react properly -- often a delay is built into indication of failure
of soft ground to allow for noise rejection.
depress EMI “High” button.
indicating good ground connection and blinking red light indicating
presence of EMI. In WS Aware the ground light should be pulsed yellow
light or continuous yellow (older models). Release “High” EMI button and
depress “Low” EMI button while keeping “Pass” Metal Ground button
depressed. No EMI indication should be present on the monitor.
other monitor use these monitors’ User’s Guides for information on their
proper operation and indication.
Test jack of the Checker
Make sure that the contact is good.
A momentary “blink” of pass light on the monitor (typically green) when the
button is depressed is acceptable.
indicate good ground (typically green light). Allow up to 30 seconds for
alarm to trigger for some monitors.
failure. Allow up to 30 seconds for alarm to trigger for some monitors.
Plug banana end of red cable of the Checker into the Ground Under
Plug the thin tip of red cable into soft ground terminal of your monitor.
Ground monitor shall indicate failure (typically, red light on the monitor).
Depress “Soft Ground” button on your Checker. Ground monitor shall
After release of “Soft Ground” button the ground monitor shall indicate
Follow instructions in Basics
1000 MOhms
200 MOhms
100 MOhms
10 MOhms
Dissipative ground resistance setting is done using switches 1...4.
Basics
Basics
Basics
Basics section
In Ground Master you should see green light
1 1 1 1 1
0
0
0
1
Switch P
Switch P
Switch P
Switch P
Switch Position
2 2 2 2 2
0
0
1
1
osition
osition
osition
osition
3 3 3 3 3
0
1
1
1
4 4 4 4 4
1
1
1
1
For
switch for Wriststraps
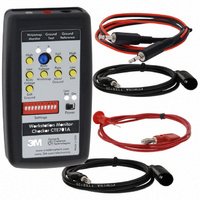
Quick Tour of your Checker
Checker uses 9V alkaline battery. Make sure that a fresh battery is installed prior
to performing any test. If you are not planning to use your Checker for a long time,
please remove the battery from the device.
Body Voltage Set
Potentiometer and
LEDs
High (Fail) and Low
(Pass) switches for
Wriststrap Monitor Test
Threshold Setting
body voltage on
Pass (Low Limit)
Soft Ground
Pass Switch
3.5mm Jack for
operator
Switches
Banana Jack for
Ground Test
Reference Ground
Banana Jack for
Power Switch and LED
High (Fail) and Low (Pass)
switches for Metal Grounds
Low Battery and Power LEDs
High (Fail) and Low (Pass)
switches for EMI on Metal
Grounds
3