400293 Bergquist, 400293 Datasheet - Page 5
400293
Manufacturer Part Number
400293
Description
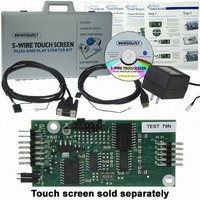
KIT STARTER FOR TOUCH SCREEN MOD
Manufacturer
Bergquist
Specifications of 400293
Sensor Type
Touch Screen
Interface
USB, PS/2, or Serial (RS-232)
Voltage - Supply
5 V ~ 24 V
Embedded
No
Utilized Ic / Part
500499
Lead Free Status / RoHS Status
Lead free / RoHS Compliant
Sensitivity
-
Sensing Range
-
Other names
BER245


In-Process Calibration Test (continued)
2. Select “Accept” to apply and record your calibration data. Select “Cancel” to
3. Once you return to the Calibration tab, click “OK” or “Apply” to save your settings.
DRAWING TEST:
Once you have calibrated your touch screen, you may test the configuration to
ensure it is working properly. A simple, effective test is as follows:
1. On the Calibration tab of the Control Panel (see Figure 9), click “Test. ”
2. Draw on the screen with your finger or a stylus and notice if the screen is
3. Click or touch “Quit” to exit the drawing test screen.
RIGHT-CLICK SETTINGS:
“
This feature allows the user to initiate a mouse right-click by holding down a touch
point for a specified period of time.
1. Click “Enable right click emulation” box (see Figure 14).
2. Use the slider bar to set the amount of time needed to produce a
3. Click or touch “Apply” to test.
Event Area:
Since it may be difficult to touch and hold an exact point on any touch screen for
a length or time, an “event area” is used to establish the size of the area in which
a “hold” is acceptable.This event area should be set to an area that is as big as your
finger tip.
1. Use the slider bar to increase or decrease the event area size (see Figure 14).
2. a) Click or touch “Apply” to apply your selection, OR
Timed Hold” Right-Click Mouse Event:
return to the Calibration tab.
displaying your drawing accurately (see Figure 13).
right-click event.
The size of the event area is displayed to the right of the slider bar.
If you have multiple monitors, return to the “Screen Selection” tab and select
another monitor to calibrate.
b) Click or touch “OK” to apply and exit the Control Panel.
Touch Screen Controller User's Guide - 5
Figure 13
Figure 14
Related parts for 400293
Image
Part Number
Description
Manufacturer
Datasheet
Request
R

Part Number:
Description:
THERMAL PAD TO-220 .009" SP1000
Manufacturer:
Bergquist
Datasheet:

Part Number:
Description:
BOARD LED IMS SEOUL SEMI Z-PWR
Manufacturer:
Bergquist
Datasheet:

Part Number:
Description:
BOARD LED IMS GOLDEN DRAGON
Manufacturer:
Bergquist
Datasheet:

Part Number:
Description:
BRD STAR LED IMS LUMEX SML-LX
Manufacturer:
Bergquist
Datasheet:

Part Number:
Description:
BRD STAR LED IMS LITE-ON LOPL
Manufacturer:
Bergquist
Datasheet:

Part Number:
Description:
BRD STAR LED IMS LUXEON K2
Manufacturer:
Bergquist
Datasheet:

Part Number:
Description:
BRD STAR LED IMS GOLDEN DRAGON
Manufacturer:
Bergquist
Datasheet:

Part Number:
Description:
BOARD LED IMS CREE X-LAMP
Manufacturer:
Bergquist
Datasheet:

Part Number:
Description:
BRD STAR LED IMS AVAGO MOONSTONE
Manufacturer:
Bergquist
Datasheet:

Part Number:
Description:
BRD STAR LED IMS LUXEON REBEL
Manufacturer:
Bergquist
Datasheet:


Part Number:
Description:
LAMP INCAND T3.25 GLSS WEDGE 28V
Manufacturer:
JKL Components Corp.
Datasheet:

Part Number:
Description:
Soldering Tools Weller Sponge/Tray Kleen-tip
Manufacturer:
Apex Tool Group (Formerly Cooper Tools)

