ETRX3DVKA357 Telegesis Ltd, ETRX3DVKA357 Datasheet - Page 20
ETRX3DVKA357
Manufacturer Part Number
ETRX3DVKA357
Description
KIT DEVELOPMENT FOR ETRX357
Manufacturer
Telegesis Ltd
Type
ZigBit™r
Specifications of ETRX3DVKA357
Frequency
2.4GHz
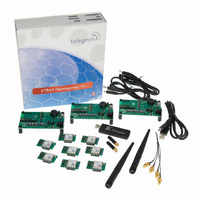
Kit Contents
3x ETRX35xDV Development Boards, 3x USB Cables, 2x ETRX35x On Carrier Boards, 2x ETRX35xHR Boards
Mcu Supported Families
ETRX3
Silicon Manufacturer
Telegesis
Rohs Compliant
Yes
Lead Free Status / RoHS Status
Lead free / RoHS Compliant
For Use With/related Products
ETRX357
Lead Free Status / RoHS Status
Lead free / RoHS Compliant, Lead free / RoHS Compliant
Other names
920-1009
ETRX2DVK357
ETRX2DVK357


11.3.2 Network Setup
Once the network is established, remote nodes can be powered up ready to join in. If you have
serial access to remote nodes simply issue the AT+JN command or press the ‘Join any PAN’
button, to join the newly established PAN. If you don’t have serial access to the remote nodes (as
is the case of the two MCBs provided with the previous ETRX2 based DVKA) you will just need to
wait for them to join the network automatically. By default, once every minute, all nodes (except
coordinators) are set up to check whether there are any neighbours on the same PAN nearby, or if
they have been orphaned. If no neighbours are found after 5 consecutive tries, the unit will leave
the (deserted) PAN and try to join into a new one, once every minute.
This initial network set-up can take a few minutes, especially with no serial access to remote
nodes, but once the network is set up it will remain set even after power cycles. New nodes joining
will cause a prompt ‘NEWNODE:’ on the remote side and display the JPAN message locally as
described above.
To learn more about setting up and maintaining a PAN please refer to the user guide and the AT
Command Dictionary.
©2010 Telegesis (UK) Ltd
Figure 20. Command Line Interactions
- 20 -
ETRX35xDVK Product Manual (Rev 1.01)
To establish a PAN network issue the
AT+EN command, or alternatively
press the ‘Establish PAN’ button.
The local unit will now scan all
available 16 channels and establish a
PAN with a random PAN ID, on the
quietest available one. This may take
up to 16 seconds and leads to the
node
coordinator.
module will prompt ‘JPAN’ followed by
the details of the newly created PAN.
If you get an error message instead, it
is likely that the module was already
part of a PAN, so you will need to
issue the AT+DASSL command or
press the ‘Disas Local’ button to
leave the PAN before going back to
starting a new one. In order to find
out about the network status simply
issue the AT+N command or press
the ‘NWK Info’ button.
ETRX35x Development Kit
becoming
When successful the
the
networks
Related parts for ETRX3DVKA357
Image
Part Number
Description
Manufacturer
Datasheet
Request
R

Part Number:
Description:
MODULE ZIGBEE USB STICK
Manufacturer:
Telegesis Ltd
Datasheet:

Part Number:
Description:
MODULE ZIGBEE PWR AMP USB STICK
Manufacturer:
Telegesis Ltd
Datasheet:

Part Number:
Description:
ZIGBEE ETHERNET ACCESS POINT
Manufacturer:
Telegesis Ltd
Datasheet:

Part Number:
Description:
ZIGBEE ETHERNET ACCESS POINT
Manufacturer:
Telegesis Ltd
Datasheet:

Part Number:
Description:
MODULE ZIGBEE EM357 W/CHIP ANT
Manufacturer:
Telegesis Ltd
Datasheet:

Part Number:
Description:
MODULE ZIGBEE EM250 CHIP ANT
Manufacturer:
Telegesis Ltd
Datasheet:

Part Number:
Description:
MODULE ZIGBEE W/PWR AMP
Manufacturer:
Telegesis Ltd
Datasheet:
Part Number:
Description:
MODULE ZIGBEE W/PA LNA CHIP ANT
Manufacturer:
Telegesis Ltd
Datasheet:
Part Number:
Description:
MODULE ZIGBEE W/PA LNA U.FL
Manufacturer:
Telegesis Ltd
Datasheet:
Part Number:
Description:
MODULE, ZIGBEE, ETRX351, CHIP ANT
Manufacturer:
Telegesis Ltd
Datasheet:
Part Number:
Description:
MODULE, ZIGBEE, ETRX3, HIROSE
Manufacturer:
Telegesis Ltd
Datasheet:
Part Number:
Description:
MODULE, ZIGBEE, ETRX3, PA+LNA, CHIP
Manufacturer:
Telegesis Ltd
Datasheet:
Part Number:
Description:
MODULE, ZIGBEE, ETRX3, PA+LNA, HIROS
Manufacturer:
Telegesis Ltd
Datasheet:
Part Number:
Description:
MODULE, ZIGBEE, ETRX351, HIROSE
Manufacturer:
Telegesis Ltd
Datasheet:
Part Number:
Description:
MODULE
Manufacturer:
Telegesis Ltd
Datasheet: