CAN-100 Fujitsu Semiconductor America Inc, CAN-100 Datasheet - Page 6
CAN-100
Manufacturer Part Number
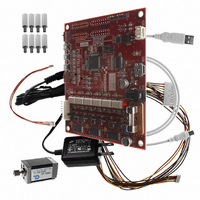
CAN-100
Description
BOARD EVAL RS232 100QFP
Manufacturer
Fujitsu Semiconductor America Inc
Series
FRr
Type
MCUr
Specifications of CAN-100
Contents
Board, BLDC Motor, Cables, Power Supply
For Use With/related Products
MB91F267N
Lead Free Status / RoHS Status
Lead free / RoHS Compliant
Other names
865-1102
Available stocks
Company
Part Number
Manufacturer
Quantity
Price
Company:

Part Number:
CAN-100
Manufacturer:
Fujitsu Semiconductor America
Quantity:
135


AN07-00180-3E
List of Figures
Figure 1-1 External board view ......................................................................................... 14
Figure 1-2 System connection diagram ............................................................................ 16
Figure 1-3 Downloading the USB driver ................................................................................ 20
Figure 1-4 Installing FT232R USB UART ............................................................................. 21
Figure 1-5 Selecting the search locations................................................................................ 22
Figure 1-6 Completing the USB Serial Converter installation.................................................... 22
Figure 1-7 Installing USB Serial Port .................................................................................... 23
Figure 1-8 Selecting the search locations................................................................................ 23
Figure 1-9 Completing the USB Serial Port installation ............................................................ 24
Figure 1-10 SOFTUNE setup confirmation ............................................................................ 25
Figure 1-11 Starting SOFTUNE setup ................................................................................... 25
Figure 1-12 Caution on SOFTUNE setup ............................................................................... 26
Figure 1-13 SOFTUNE setup/License agreement .................................................................... 26
Figure 1-14 SOFTUNE setup/Version information .................................................................. 27
Figure 1-15 SOFTUNE setup/Selecting the destination of installation ........................................ 27
Figure 1-16 SOFTUNE setup/Selecting the components........................................................... 28
Figure 1-17 SOFTUNE setup/Confirming the installation settings ............................................. 28
Figure 1-18 SOFTUNE setup/Completion .............................................................................. 29
Figure 1-19 PC Writer/Installation dialog ............................................................................... 30
Figure 1-20 PC Writer/Setup type ......................................................................................... 31
Figure 1-21 PC Writer/Ready to install .................................................................................. 31
Figure 1-22 Completing the PC Writer installation .................................................................. 32
Figure 1-23 MODE selection................................................................................................ 33
Figure 1-24 Connection between the PC and the board............................................................. 34
Figure 2-1 Opening a workspace ........................................................................................... 36
Figure 2-2 Selecting a workspace .......................................................................................... 37
Figure 2-3 Building a project ................................................................................................ 37
Figure 2-4 Completing the build ........................................................................................... 38
Figure 2-5 Opening the file to write....................................................................................... 38
Figure 2-6 Selecting the file to write ...................................................................................... 39
Figure 2-7 Select the COM port to be used for the writing ........................................................ 40
Figure 2-8 Checking the COM port ....................................................................................... 41
Figure 2-9 Writing the program ............................................................................................ 42
Figure 2-10 Completing the program writing .......................................................................... 42
- 6 -
Related parts for CAN-100
Image
Part Number
Description
Manufacturer
Datasheet
Request
R

Part Number:
Description:
IC POWER SUPPLY MONITOR 8SOP
Manufacturer:
Fujitsu Semiconductor America Inc
Datasheet:
Part Number:
Description:
IC POWER SUPPLY MONITOR 8SOP
Manufacturer:
Fujitsu Semiconductor America Inc
Datasheet:

Part Number:
Description:
IC MCU 60K FLASH 2KB RAM 52LQFP
Manufacturer:
Fujitsu Semiconductor America Inc
Datasheet:

Part Number:
Description:
IC MCU 32BIT 256KB FLASH 120LQFP
Manufacturer:
Fujitsu Semiconductor America Inc
Datasheet:
Part Number:
Description:
IC CTLR TOUCH SENSOR 12CH 30SSOP
Manufacturer:
Fujitsu Semiconductor America Inc
Datasheet:

Part Number:
Description:
IC CTLR TOUCH SENSOR 12CH 40QFN
Manufacturer:
Fujitsu Semiconductor America Inc
Datasheet:
Part Number:
Description:
SYNTHESIZER PLL DUAL INP 20SSOP
Manufacturer:
Fujitsu Semiconductor America Inc
Datasheet:

Part Number:
Description:
SYNTHESZR PLL 1.1GHZ DUAL 16SSOP
Manufacturer:
Fujitsu Semiconductor America Inc
Datasheet:

Part Number:
Description:
IC SSCG EMI RED 8-SOIC
Manufacturer:
Fujitsu Semiconductor America Inc
Datasheet:

Part Number:
Description:
IC SSCG EMI RED 8-TSSOP
Manufacturer:
Fujitsu Semiconductor America Inc
Datasheet:

Part Number:
Description:
IC SSCG EMI RED 8-SOP
Manufacturer:
Fujitsu Semiconductor America Inc
Datasheet:

Part Number:
Description:
SYNTHESIZER PLL 2.5GHZ 16SSOP
Manufacturer:
Fujitsu Semiconductor America Inc
Datasheet:
Part Number:
Description:
SYNTHESIZER PLL 1.2GHZ 16SSOP
Manufacturer:
Fujitsu Semiconductor America Inc
Datasheet:

Part Number:
Description:
SYNTHESIZER PLL 2.5GHZ 16BCC
Manufacturer:
Fujitsu Semiconductor America Inc
Datasheet:

Part Number:
Description:
IC SSCG EMI RED 8-SOP
Manufacturer:
Fujitsu Semiconductor America Inc
Datasheet: