CY8CKIT-006 Cypress Semiconductor Corp, CY8CKIT-006 Datasheet - Page 10
CY8CKIT-006
Manufacturer Part Number
CY8CKIT-006
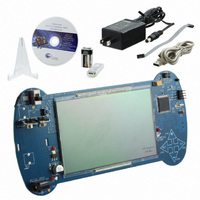
Description
KIT DEV PSOC3 LCD SEGMENT
Manufacturer
Cypress Semiconductor Corp
Series
PSOC™ 3r
Specifications of CY8CKIT-006
Main Purpose
Displays, LCD Display
Embedded
Yes, MCU, 32-Bit
Primary Attributes
448 addressable segments
Secondary Attributes
Configurable LCD pin selection
Description/function
Evaluation Kit
Interface Type
USB
Backlighting
No Backlighting
Data Bus Width
8 bit, 16 bit, 32 bit
Maximum Operating Temperature
+ 50 C
Minimum Operating Temperature
0 C
Number Of Segments
7
Operating Supply Voltage
12 V
Operating Voltage
3.3 V
Pixel Format
16 x 28
Product
Display Modules
Software
Software Included
Touch Panel
No Touch Panel
For Use With/related Products
PSoC 3
Lead Free Status / RoHS Status
Lead free / RoHS Compliant
Utilized Ic / Part
-
Lead Free Status / Rohs Status
Lead free / RoHS Compliant
Other names
428-2994
Available stocks
Company
Part Number
Manufacturer
Quantity
Price
Company:

Part Number:
CY8CKIT-006
Manufacturer:
Cypress Semiconductor Corp
Quantity:
135


Kit Operation
3.2
3.3
3.3.1
10
Main Menu
Supply power to the board either through 9V battery, 9V to 12V wall adaptor, or USB. Refer to
Supply Options on page 22
name is scrolled from right to left across the matrix display. When the scrolling is complete, "Push
SEL" is flashed to prompt you to press the CapSense Select button. After pressing SEL, the first
main menu selection, PUNCH is shown on the matrix display. Press the "+" or "-" CapSense buttons
to select a mode from one of the main menu selections.
Table 3-2. Main Menu Options
To select a mode, press SEL when the desired mode name is displayed.
PUNCH
If you select PUNCH, the project enters the Punch menu item. PUNCH automatically enters the
GAUGE sub menu and prompts by scrolling "Push SEL to Start Gauge". If you press the SEL button,
then the PUNCH Gauge continues
PUNCH returns to its sub menu selections. Pressing "+" or "-" allows you to select a Punch sub
menu option. The sub menu options are entered by pressing SEL.
Table 3-3. PUNCH submenu options
After exiting a Punch sub menu option and returning to the Punch menu, you can either select
another Punch sub menu or press RET to return to the Main Menu.
1:GAUGE
If you select GAUGE, the display scrolls "Push SEL to Start Gauge". When you press SEL, a punch
recording session begins. The project automatically starts measuring the peak at rest acceleration of
the LCD kit board. During this time, the project displays a three second count down ending in the
phrase "PUNCH!". Then the project begins peak and hold acceleration measurements in a
continuous loop. During this sampling period, the "Push SEL" prompt is flashed. You can hold the
board and "throw" punches. After throwing one or more punches, press the SEL button. The project
displays the peak acceleration that the board experienced during the punch time.
If the peak acceleration is less than 1G, then the score is displayed as 0.0G. The peak acceleration is
displayed on the large 7-segment display in the form X.X with a "G" shown on the 16-segment
display (for example, 4.6G). If the peak acceleration is greater than the current lowest score, then
the project prompts you to enter a name. Note The first five scores after performing a Clear (see
1:CLEAR on page
score.
PUNCH
RTC/TEMP
CONTRAST
LCD DEMO
1:GAUGE
1:HIGH
1:RECALL
1:CLEAR
Option
Option
CY8CKIT-006 PSoC 3 LCD Segment Drive Evaluation Kit Guide, Doc. # 001-52798 Rev. *C
11) are always recorded. An empty score has a 0G value in the test for lowest
Punch gauge
Real Time Clock Time/Temperature Display with Set Time/Date/Alarm
Set LCD contrast level
Display all icons and segment characters in sequence
for more information on options to power the board. On startup, the kit
Record a punch acceleration.
View the current high score.
View the recorded top five high scores and the average score.
Clear the saved high scores.
(1:GAUGE on page 10
Brief Description
Brief Description
section). By pressing the RET button, the
Power
[+] Feedback
Related parts for CY8CKIT-006
Image
Part Number
Description
Manufacturer
Datasheet
Request
R

Part Number:
Description:
KIT DEV FOR PSOC3/5
Manufacturer:
Cypress Semiconductor Corp
Datasheet:

Part Number:
Description:
PSoC1/3/5 Development Kit
Manufacturer:
Cypress Semiconductor Corp
Datasheet:

Part Number:
Description:
KIT DEV PSOC PROC MODULE CY8C38
Manufacturer:
Cypress Semiconductor Corp

Part Number:
Description:
KIT DEV PSOC PROC MODULE CY8C29
Manufacturer:
Cypress Semiconductor Corp

Part Number:
Description:
KIT DEV PSOC ANALOG VOLTMETER
Manufacturer:
Cypress Semiconductor Corp
Datasheet:

Part Number:
Description:
KIT DEV PSOC5 FIRST TOUCH
Manufacturer:
Cypress Semiconductor Corp
Datasheet:

Part Number:
Description:
KIT DEV PSOC3 FIRSTTOUCH STARTER
Manufacturer:
Cypress Semiconductor Corp
Datasheet:
Part Number:
Description:
KIT DEV PROC MODULE PSOC5
Manufacturer:
Cypress Semiconductor Corp
Datasheet:

Part Number:
Description:
KIT PSOC CY8C28 FAMILY PROCESSOR
Manufacturer:
Cypress Semiconductor Corp
Datasheet:

Part Number:
Description:
KIT PSOC MINIPROG3 PROGRAM DEBUG
Manufacturer:
Cypress Semiconductor Corp
Datasheet:

Part Number:
Description:
KIT EVAL POWERLINE HIGH VOLT
Manufacturer:
Cypress Semiconductor Corp
Datasheet:

Part Number:
Description:
KIT PSOC FIRST TOUCH
Manufacturer:
Cypress Semiconductor Corp
Datasheet:

Part Number:
Description:
EVAL KIT WORLDTOUR2
Manufacturer:
Cypress Semiconductor Corp
Datasheet:

Part Number:
Description:
KIT UNIVERSAL CAPSENSE CTRLR
Manufacturer:
Cypress Semiconductor Corp
Datasheet:
