DV007004 Microchip Technology, DV007004 Datasheet - Page 21
DV007004
Manufacturer Part Number
DV007004
Description
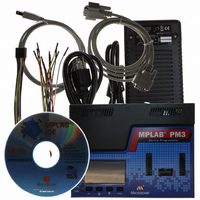
PROGRAMMER UNIVERSAL PM3
Manufacturer
Microchip Technology
Series
MPLAB® PM3r
Type
Universalr
Specifications of DV007004
Contents
MPLAB PM3 Programming Unit, Cables, Power Supply and IDE
Positions/sockets
1
Ic Product Type
Programmer, Universal
Supported Families
PICmicro, DsPIC30F
Kit Contents
LCD, ICSP Support, 40-pin Socket, Digital/Multimedia Card Slot
Rohs Compliant
NA
Lead Free Status / RoHS Status
Lead free / RoHS Compliant
For Use With/related Products
Microchip's PICmicro devices including dsPIC30F
Lead Free Status / Rohs Status
Lead free / RoHS Compliant
For Use With
PICmicro And DsPIC30F DSC Devices
Lead Free Status / RoHS Status
Lead free / RoHS Compliant, Lead free / RoHS Compliant
Available stocks
Company
Part Number
Manufacturer
Quantity
Price
Company:

Part Number:
DV007004
Manufacturer:
Microchip Technology
Quantity:
135
Company:
Part Number:
DV007004
Manufacturer:
MICROCHIP
Quantity:
12 000
Company:
Part Number:
DV007004 (MPLAB PM3)
Manufacturer:
MICROCHIP
Quantity:
12 000


2.4
© 2006 Microchip Technology Inc.
POWERING UP MPLAB PM3
1. Align the connectors on the adapter with the connectors on MPLAB PM3.
2. Push the adapter down evenly mating the connectors.
3. Align the socket module with the adapter on MPLAB PM3.
4. Tighten the two socket module thumb screws evenly and simultaneously. Avoid
It is always a good practice to insert a known blank device and do a Blank Check
whenever the socket module it changed.
2.3.3.2
1. Connect the ICSP cable connector to the ICSP socket on MPLAB PM3
2. Leave the individual leads unconnected at this time.
2.3.3.3
1. Align the MPLAB PM3 Card with the SD-MMC slot on the back of the
2. Push the card into the slot.
3. To remove the card, push in to eject.
Once you have connected the hardware and installed the software, you are ready to
turn on MPLAB PM3. Turn the power switch on the side of MPLAB PM3 to l (ON)
(refer back to Figure 2-1).
If any portion of the self-test fails, MPLAB PM3 will display the corrective course of
action on the LCD panel. For normal start-up, the MPLAB PM3 will beep once. See
Section B.7 “Error Messages – LCD” for information on beep codes and LCD error
messages. MPLAB IDE will provide further information to help you debug the issue.
On a successful power-up, you should see the following types of messages appear on
the LCD panel on the front of MPLAB PM3:
• MPLAB PM3 splash screen
• Version numbers and copyright dates
• MPLAB PM3 menu
At this point, you are ready to use MPLAB PM3. If you are going to use MPLAB PM3
with MPLAB IDE (Windows), please refer to Chapter 4. “Using MPLAB PM3 with
MPLAB IDE”. If you are going to use MPLAB PM3 in Stand-Alone mode, please refer
to Chapter 5. “Using MPLAB PM3 in Stand-Alone Mode”. If you are using the
MPLAB PM3 Card with either MPLAB IDE or in Stand-Alone mode, also refer to
Chapter 6. “Using the MPLAB PM3 Card”
Note:
Note:
over tightening; they should be finger-tight only.
(Figure 2-2).
MPLAB PM3 programmer, and insert the notched corner end of the card into the
slot. The card is keyed so that it only goes in one way.
ICSP CABLE INSTALLATION
MPLAB PM3 CARD INSERTION
The gold connector strips on the PRO MATE II socket module are relatively
fragile. Avoid touching them with the socket module screws and avoid
over-tightening the screws.
MPLAB PM3 automatically performs a self-test ensuring the programmer is
functional. No calibration is required.
DS51464C-page 15
Related parts for DV007004
Image
Part Number
Description
Manufacturer
Datasheet
Request
R

Part Number:
Description:
Manufacturer:
Microchip Technology Inc.
Datasheet:
Part Number:
Description:
Manufacturer:
Microchip Technology Inc.
Datasheet:
Part Number:
Description:
Manufacturer:
Microchip Technology Inc.
Datasheet:
Part Number:
Description:
Manufacturer:
Microchip Technology Inc.
Datasheet:
Part Number:
Description:
Manufacturer:
Microchip Technology Inc.
Datasheet:
Part Number:
Description:
Manufacturer:
Microchip Technology Inc.
Datasheet:
Part Number:
Description:
Manufacturer:
Microchip Technology Inc.
Datasheet:
Part Number:
Description:
Manufacturer:
Microchip Technology Inc.
Datasheet: