Chameleon-PIC Nurve Networks, Chameleon-PIC Datasheet - Page 113
Chameleon-PIC
Manufacturer Part Number
Chameleon-PIC
Description
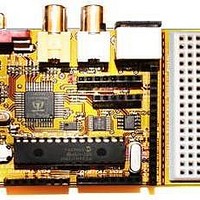
MCU, MPU & DSP Development Tools PIC24 & PROPELLER DEV SYSTEM (SBC)
Manufacturer
Nurve Networks
Datasheet
1.CHAMELEON-PIC.pdf
(263 pages)
Specifications of Chameleon-PIC
Processor To Be Evaluated
PIC24
Data Bus Width
16 bit
Interface Type
USB, VGA, PS/2, I2C, ISP, SPI
Operating Supply Voltage
3.3 V, 5 V
Lead Free Status / RoHS Status
Lead free / RoHS Compliant


Remember that %2 takes the second argument we pass to it which if you remember is our communications port in the
format COMX (e.g. COM5). This batch file is merely meant as a convince utility. You could type everything out into a
DOS terminal but then it is prone to mistakes and takes longer. In the future I’m sure somebody will write a GUI based tool
that does the same or port the PIC bootloader to the Arduino toolset.
15.2.3 Preparation to Launch the serial bootloader tools for the First Time
Before you launch the batch file bootloader tool, make sure you have the USB cable plugged into the Chameleon (you
can also have the 9V DC power adapter plugged in if you have one). The USB is needed no matter what since that’s what
the serial bootloader will use to send serial data to the Chameleon’s bootloader with. Figure 15.51 below shows the USB
cable plugged into the Chameleon PIC. The FTDI chip device makes it easy to use serial communications from the PC.
Now, if your computer recognizes the FTDI chip and has drivers it will load them automatically and install a virtual COMxx
port into your system. However, if it doesn’t you will need to install the FTDI drivers. This is needed for all serial
communications with the Chameleon, so a necessary step. You can manually install the FTDI driver from the DVD-ROM
(ZIP file), here:
After you have installed the driver, then each time you plug a Chameleon PIC into the PC via the USB port, the FTDI chip
will assign a NEW COM port, you need to determine what COM port it attached itself to. Goto Windows Start menu on
and select <Control Panel → System Properties>. select <Hardware → Device Manager> and select <Ports>, you
should see something like that shown in Figure 15.52.
Figure 15.51 – The Mini-USB port on the Chameleon connects to the FTDI USB to Serial converter chip.
FlashProg.exe -i %2 program.hex
DVD-ROM:\ CHAM_PIC \ TOOLS \ DRIVERS \ USBDriverInstallerV2.04.16.exe
TIP
The astute reader will notice that we compile all the code every single time the batch file
executes. Normally a user would use a program like the Unix “make” which compares
timestamps and only compiles files that are newer. However a simple trick would be to remove
or comment out the lines in the files that you know do not need to be compiled over and over.
For example if you are not planning on changing the device files you add the following to each of
those lines:
REM pic30-gcc.exe -mcpu=24HJ128GP502 -x c -c "CHAM_PIC_I2C_SPI_DRV_V010.c" …
Where REM comments out the line. This will drastically increase compile times.
© 2009 NURVE NETWORKS LLC “Exploring the Chameleon PIC 16-Bit”
113
Related parts for Chameleon-PIC
Image
Part Number
Description
Manufacturer
Datasheet
Request
R

Part Number:
Description:
MCU, MPU & DSP Development Tools AVR8 VIDEO GAME DEV SYSTEM (SBC)
Manufacturer:
Nurve Networks

Part Number:
Description:
MCU, MPU & DSP Development Tools PIC24 VIDEO GAME DEV SYSTEM (SBC)
Manufacturer:
Nurve Networks

Part Number:
Description:
MCU, MPU & DSP Development Tools AVR8 & PROPELLER DEV SYSTEM (SBC)
Manufacturer:
Nurve Networks
Datasheet: